How Do I Find a Stud Without a Stud Finder? 7 Easy Methods
If you need to hang a TV, shelf, mirror, cabinet, or heavy picture, you may wonder, **how do I find a stud without a stud finder?** The good news is that you do not need a special tool for every wall project. A few simple methods can help you locate the wood framing behind drywall.
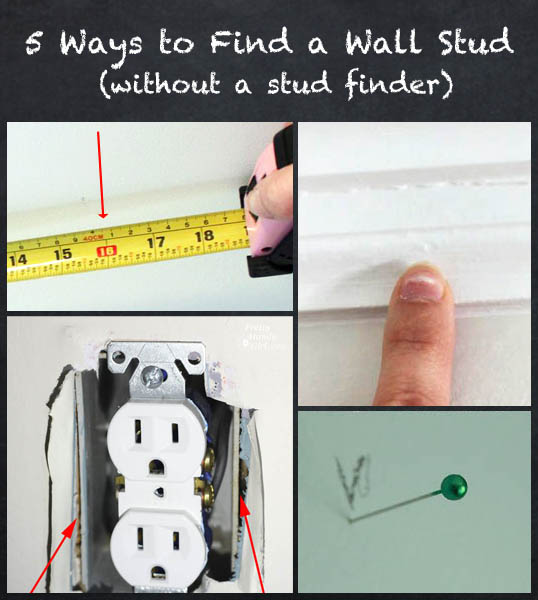
The key is to use more than one clue. A magnet can find drywall screws. An outlet can show where a stud is likely to sit. A tape measure can help you find the next stud. When two or three clues agree, you can mark the spot with much more confidence.
What Is a Wall Stud?
A wall stud is a vertical framing member inside a wall. In many U.S. homes, studs are made from wood. Some newer buildings use metal studs instead. Drywall attaches to these framing members, which makes them useful for strong wall mounting.
A stud is often stronger than the hollow space between studs. That matters when you hang something heavy. A small picture may need only a drywall anchor, while a large shelf or TV mount may need a solid connection to the framing.
- ✦ Wood studs
Wood studs are common in U.S. houses. They usually provide a firm place for a screw to hold.
- ✦ Metal studs
Metal studs can appear in apartments, offices, and some newer buildings. They behave differently from wood studs.
- ✦ Stud spacing
Many walls use studs at 16-inch centers. Some use 24-inch centers, and older or unusual walls may have different spacing.
Why Studs Matter for Wall Mounting
Finding a stud gives a screw a solid framing member to bite into. This can provide much more support than relying on drywall alone. Always match the mounting method to the weight of the item and the type of wall.
- ✦ Heavy items
Use studs when possible for TVs, cabinets, large shelves, and other heavy loads.
- ✦ Light items
Some light items can use suitable drywall anchors instead of a stud.
How Do I Find a Stud Without a Stud Finder Using a Magnet?
A strong magnet is one of the easiest answers to **how do I find a stud without a stud finder?** The magnet does not detect the wood itself. Instead, it finds the metal screws or nails that hold drywall to the framing.
Move the magnet slowly across the wall. When it sticks to the wall, you may have found a drywall screw. Find several screws in a straight vertical line, then mark the center of that line. This gives you a strong clue about the stud behind the drywall.

- ✦ Start near the top
Move the magnet slowly across the wall near the upper part of the drywall.
- ✦ Find more than one screw
One magnetic spot can be misleading. Look for several points that line up vertically.
- ✦ Mark the line
Use a pencil or removable tape to mark the vertical line where the screws appear.
Why the Magnet Method Works
Drywall screws are usually made from steel or another magnetic metal. The screws attach the drywall to the framing. Because the screws tend to follow the stud, a vertical row of magnetic spots can reveal the stud’s position.
- ✦ Best tool
A small but reasonably strong magnet works well. A flexible magnetic strip can also help you scan a wider area.
- ✦ Main limit
The magnet finds fasteners, not wood. It may not work well if the wall uses different fasteners or has unusual construction.
Use an Electrical Outlet or Light Switch as a Clue
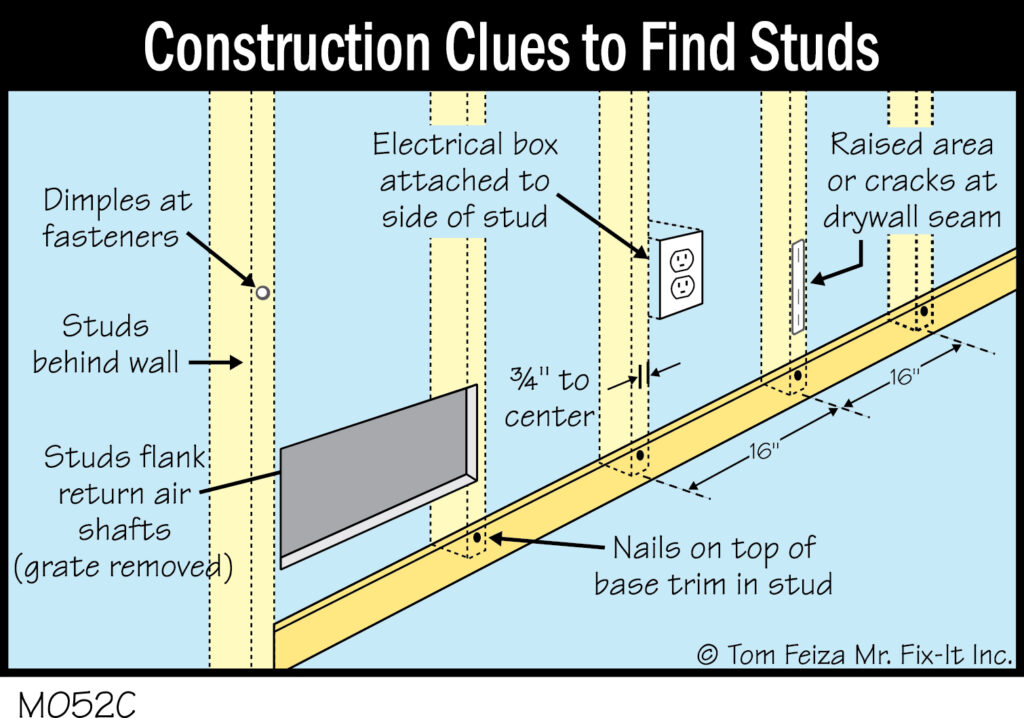
Another useful answer to **how do I find a stud without a stud finder?** is to look at an electrical outlet or light switch. Electrical boxes are often attached to wall framing. The stud may be on one side of the box.
Turn off power before removing any electrical cover. You usually do not need to remove the box itself. Simply use the box position as a clue, then confirm the stud location with another method such as a magnet.
- ✦ Look at the box
Many electrical boxes are secured to a stud or framing member. This gives you a useful reference point.
- ✦ Do not assume the side
The framing may be on the left or right side of the box, depending on how the wall was built.
- ✦ Confirm before drilling
Use a magnet or another safe method to verify the likely stud location.
Stay Safe Around Electrical Boxes
Do not probe inside an outlet or switch box with a tool. Do not drill close to wiring just because a stud seems likely. If you are unsure about hidden wiring, plumbing, or other hazards, stop and use a safer method or ask a qualified professional.
- ✦ Turn off power
If you need to work near an electrical device, switch off the correct circuit and verify that the power is off.
- ✦ Avoid guessing
A stud location does not tell you where wires or pipes run inside the wall.
Find Studs With a Tape Measure
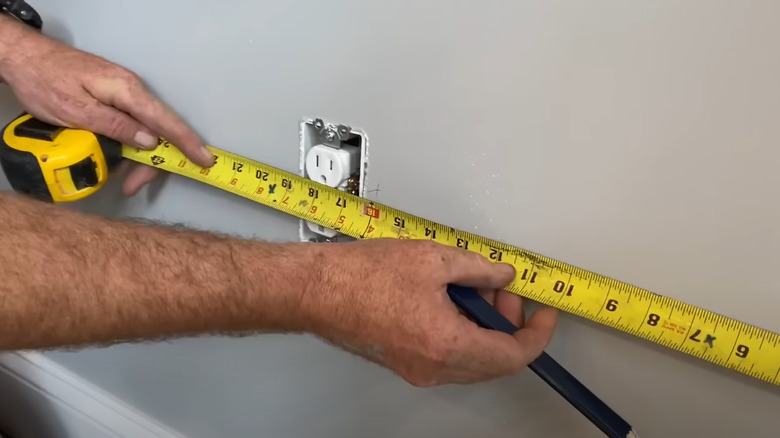
A tape measure can help once you find one reliable stud. In many U.S. homes, wall studs are placed 16 inches on center. That means the centers of nearby studs are often 16 inches apart. Some walls use 24-inch spacing, so treat this as a clue rather than a rule.
Measure from the center of a confirmed stud and check the wall at 16-inch intervals. Use a magnet to test each predicted location. This approach is faster than searching the whole wall from scratch.
- ✦ Find one first
Start with a confirmed stud found by a magnet, outlet clue, or another reliable method.
- ✦ Measure 16 inches
Check about 16 inches from the center of the first stud because this is a common framing layout.
- ✦ Check both directions
Look 16 inches to the left and right, then continue outward as needed.
- ✦ Confirm the pattern
Use fastener marks or another clue before drilling into a predicted location.
Why 16 Inches Is Not a Guarantee
Stud spacing can change near doors, windows, corners, plumbing, and other wall features. Older homes may also have different framing layouts. If the 16-inch pattern stops making sense, go back to direct clues instead of forcing the measurement.
- ✦ Corners
Framing near corners may not follow the same simple spacing pattern.
- ✦ Doors and windows
Openings need extra framing, so nearby studs can be closer together.
Tap the Wall and Listen for a Change in Sound
Tapping is another old-school answer to **how do I find a stud without a stud finder?** Tap lightly across the wall with your knuckles. A hollow area can sound different from an area backed by framing.
This method takes practice. Drywall thickness, insulation, wall coverings, and room noise can change the sound. Use tapping as a clue, then confirm the result with a magnet or another method.

- ✦ Tap lightly
Use your knuckles and make small, gentle taps rather than hitting the wall hard.
- ✦ Compare nearby areas
Listen for changes as you move across the wall instead of judging one tap by itself.
- ✦ Confirm the result
Use a magnet or visible construction clue to verify the likely stud.
What the Sound Can Tell You
A hollow sound often suggests open wall space, while a firmer sound may suggest framing or another solid surface behind the drywall. Still, sound alone cannot tell you exactly what is behind the wall.
- ✦ Firm sound
A less hollow sound can be a useful clue that framing may be nearby.
- ✦ Hollow sound
A hollow sound can suggest a gap between framing members.
Look for Wall Clues Around Trim and Openings
Your wall may already contain clues about its framing. Baseboards, crown molding, door trim, window trim, and other finish materials are often attached to framing. You may spot small nail or fastener marks along these areas.
Once you identify a likely fastener line, follow it upward or across the wall. This can help you estimate where framing sits. Do not remove trim just to find a stud unless the project already calls for it.

- ✦ Baseboards
Look for small nail marks or fastener patterns along the baseboard.
- ✦ Door trim
Framing around a door opening can provide useful reference points.
- ✦ Window trim
Window openings often have added framing that can help explain nearby stud locations.
- ✦ Corners
Wall corners usually contain framing, although the exact layout varies.
Use Visible Clues Without Damaging the Wall
A bright flashlight held at a low angle can make tiny nail holes or surface changes easier to see. A pencil mark or removable tape can help you track possible stud locations while you test them.
- ✦ Use light
Shine a flashlight across the surface to reveal small changes in the wall.
- ✦ Mark lightly
Use removable marks so you do not create unnecessary holes while searching.
Use a Small Test Hole Only When Appropriate
If other methods give you a strong estimate, a very small test hole can help confirm the location. A thin nail or small drill bit can tell you whether you have drywall alone or a solid framing member behind it. This is not the first method to use, but it can help when the wall gives mixed signals.
Before making any hole, think about hidden utilities. Electrical wires and plumbing may run through walls. Never assume that a stud location makes drilling safe. For important or uncertain work, use appropriate safety checks or get professional help.

- ✦ Test in a low-risk spot
Choose a location that will be covered by the final hardware or can be repaired easily.
- ✦ Use a small bit
A small test hole can provide information while limiting wall damage.
- ✦ Stop if resistance feels wrong
Do not force a drill into unexpected resistance. Stop and reassess what may be behind the wall.
- ✦ Repair unused holes
Fill small unnecessary holes with suitable patching compound and touch up the finish.
How to Tell What You Hit
Drywall usually offers light resistance before the bit enters the hollow space behind it. A wood stud provides stronger resistance and allows a screw to bite into solid material. If you hit metal, masonry, or something unexpected, stop rather than assuming it is a stud.
- ✦ Wood
A steady, firm resistance can indicate wood framing.
- ✦ Empty space
The bit may pass through the drywall and meet little resistance.
- ✦ Unexpected material
Metal, masonry, or other resistance calls for caution and further investigation.
How to Confirm a Stud Before You Drill
Knowing **how do I find a stud without a stud finder** is only half the job. The next step is to confirm the location. The safest simple approach is to combine clues rather than trust one method.
For example, you might find a likely stud with an outlet, confirm a vertical row of drywall screws with a magnet, and then check that nearby studs fit the expected spacing. When several clues agree, you have a much stronger basis for placing your hardware.
- ✦ Use two methods
Combine a direct clue, such as a magnet, with a layout clue, such as stud spacing.
- ✦ Mark the center
Mark the center of the stud rather than its edge when planning the screw location.
- ✦ Check the item weight
Make sure the mounting method can support the item and its expected load.
- ✦ Check for hazards
Consider electrical wiring, plumbing, and other hidden materials before drilling.
A Simple Confirmation Process
First, find one likely stud with a magnet or an electrical-box clue. Next, trace the suspected stud line and look for more fasteners. Then measure to nearby likely studs. If the clues do not agree, stop and search again rather than drilling based on a guess.
- ✦ Step 1
Locate a likely stud using a magnet, outlet, switch, or visible framing clue.
- ✦ Step 2
Confirm the vertical line with several fastener points when possible.
- ✦ Step 3
Use common spacing as a guide to find nearby studs.
- ✦ Step 4
Check the planned mounting point and hidden-utility risks before drilling.
Common Mistakes When Finding Wall Studs
Many DIY mistakes happen because one clue gets treated as proof. A 16-inch measurement can be wrong near a window. A tapping sound can be misleading. One magnetic spot can also be a stray metal fastener rather than a clear stud line.
Take a few extra minutes to confirm the location. It is usually easier to erase a pencil mark than to repair a misplaced hole, damaged wire, or broken pipe.
- ✦ Assuming every stud is 16 inches apart
Sixteen inches is common, but it is not universal. Check the actual wall.
- ✦ Trusting one magnetic spot
A single fastener does not prove the full stud location. Look for a vertical pattern.
- ✦ Drilling right away
Confirm the stud and consider hidden utilities before drilling.
- ✦ Ignoring wall type
Plaster, masonry, metal framing, and unusual construction can change how each method works.
- ✦ Forcing a screw
Unexpected resistance may indicate material other than wood. Stop and investigate.
When These Methods May Not Work Well
Stud-finding tricks work best on common drywall walls with accessible framing. Thick plaster, tile, paneling, metal framing, concrete, brick, and walls with dense insulation can make simple clues harder to read. In these cases, a different tool or a professional assessment may be safer.
- ✦ Plaster walls
Older plaster construction can make tapping and magnetic patterns less clear.
- ✦ Masonry walls
Brick and concrete do not use ordinary wood-stud framing in the same way.
- ✦ Metal framing
Metal studs can produce different drilling and mounting results than wood studs.