How to Find Ceiling Studs: 7 Easy Methods That Work
If you need to hang something from a ceiling, the first step is finding solid framing. In a ceiling, that framing is usually called a **joist**, not a stud. Many people still search for “how to find ceiling studs,” so this guide uses both terms to make the process easy to follow.
The best method depends on the ceiling surface, the weight you plan to hang, and what tools you have. A modern electronic stud finder can save time, but a simple magnet and a tape measure can work well too. In hands-on home projects, I find that using two methods to confirm the same spot is much safer than trusting one clue alone.
What Is a Ceiling Stud?
A ceiling stud is usually a **ceiling joist**. Joists are horizontal framing members that support the ceiling and help transfer loads to walls or other structural parts of the building. In a typical wood-framed home, drywall or plaster attaches to these members.
When people ask how to find ceiling studs, they often want to know where they can place a screw. The key point is that a ceiling joist gives a screw a solid wood or engineered framing member to grip. A drywall anchor only grips the ceiling material, so it may not be suitable for a heavy load.
Ceiling framing can vary by home. Some ceilings use wood joists, while others use engineered wood, steel framing, trusses, or other systems. If you are unsure what is above the ceiling, take extra care before drilling.

- ✦ Joist
A horizontal framing member that supports a ceiling or floor.
- ✦ Drywall
A common ceiling finish that covers the framing below it.
- ✦ Truss
A framed structural system that may use several connected members instead of simple joists.
Why Finding the Joist Matters
A joist can provide a much stronger attachment point than the ceiling surface alone. This matters when you install items such as light fixtures, ceiling fans, storage hardware, or other loads.
The required support depends on the item, its weight, and how it attaches. For heavy or safety-critical fixtures, follow the manufacturer’s instructions and use suitable structural support rather than relying on a guessed location.
- ✦ Better support
A fastener driven into framing has a solid structural member behind it.
- ✦ Safer installation
Knowing the framing location helps reduce the chance of placing a fastener where it cannot carry the intended load.
How to Find Ceiling Studs With a Stud Finder
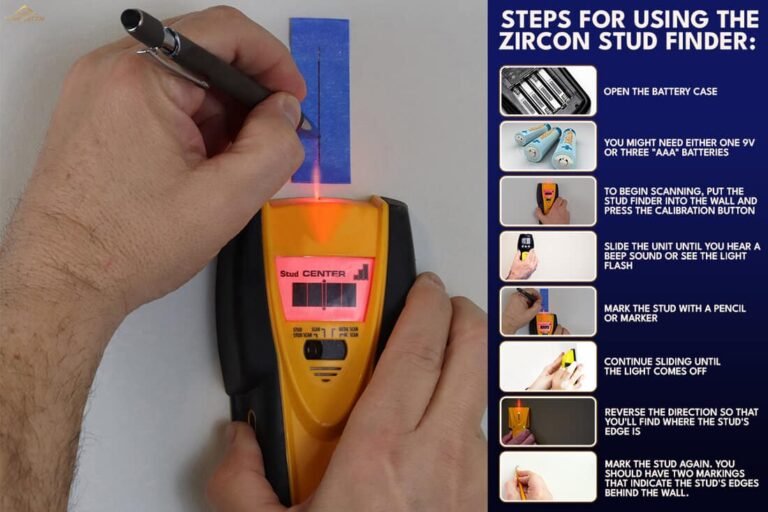
An electronic stud finder is often the quickest way to start. Most models sense changes in density behind drywall and can help identify the edges or center of framing. Read the instructions for your model because controls and sensing methods vary.
To learn how to find ceiling studs with a stud finder, start with a clean section of ceiling. Turn the tool on and calibrate it as directed. Move it slowly across the ceiling rather than rushing from one side to the other.
Mark the points where the tool detects framing. Then scan from another direction or use another method to confirm the result. A second check can help because ceiling texture, thick drywall, plaster, wiring, pipes, and other materials can affect readings.

- ✦ Calibrate first
Follow the tool’s calibration steps before scanning the ceiling.
- ✦ Move slowly
A slow, steady pass gives the sensor more time to detect changes behind the surface.
- ✦ Mark both edges
If your finder detects the edges of a joist, mark them and use the midpoint as a starting estimate for the center.
- ✦ Confirm the result
Check the suspected joist with a second method before making a permanent hole.
Why a Stud Finder May Give a False Reading
A stud finder does not see through the ceiling like an X-ray. It senses changes in the material behind the surface. Metal, wires, pipes, thick finishes, and uneven surfaces can affect what the tool reports.
If the reading seems inconsistent, scan the area again from a different direction. Do not drill simply because the tool gives one positive reading.
- ✦ Textured ceilings
Heavy texture can make it harder to keep the sensor at a steady distance from the surface.
- ✦ Plaster ceilings
Older plaster systems may behave differently from modern drywall and can be harder to scan.
- ✦ Metal framing
A metal member can produce a different reading from wood framing, so identify the framing type before choosing fasteners.
How to Find Ceiling Studs With a Magnet
A magnet can be a useful low-cost way to find ceiling framing. The trick is not that the magnet detects wood. Instead, it can find the metal screws or nails that attach the ceiling material to the framing.
Slide a strong magnet slowly across the ceiling. When it pulls toward a fastener, mark the spot. Continue moving in the same direction and look for a line of fasteners. A repeated line can reveal the path of a joist.
This method works best when the ceiling has metal fasteners close enough to the surface for the magnet to detect. It may be less useful with some construction methods, thick finishes, or fasteners that do not respond well to the magnet.

- ✦ Use a strong magnet
A small but strong magnet is easier to control and can detect some fasteners through a thin ceiling finish.
- ✦ Look for a pattern
Several fasteners in a straight line are more useful than one isolated magnetic pull.
- ✦ Mark each find
Use light pencil marks so you can trace the suspected joist without damaging the ceiling.
The Magnet Method Has Limits
A magnet tells you where a metal fastener may be. It does not prove the exact center of a joist. The fastener may sit slightly off center, and some ceilings may use fastening methods that make magnetic detection difficult.
For this reason, treat the magnet as a locating aid. Combine it with measurements, visible framing clues, or another detection method when the attachment needs to be strong.
- ✦ Not a wood detector
The magnet responds to metal, not the wood itself.
- ✦ One spot is not enough
A series of aligned fasteners gives stronger evidence than one magnetic point.
How to Find Ceiling Studs by Measuring From a Wall
Measuring can be one of the simplest ways to narrow down a joist location. In many wood-framed homes, ceiling joists follow a regular spacing pattern. Common layouts may use 16-inch or 24-inch spacing, but you should never assume a spacing pattern without checking the actual construction.
Start by identifying a wall where the joist ends or is otherwise likely to connect to the framing. Measure across the ceiling and mark likely spacing points. Then use a stud finder or magnet to check whether the expected locations match the actual framing.
This method is especially useful when a detector gives a weak reading. Measurements can help you predict where the next joist should be, while a physical check helps confirm the prediction.

- ✦ Start at a known reference
Use a wall or another confirmed framing point as your starting reference.
- ✦ Do not assume spacing
Joist spacing can vary with the building, room, load, and framing system.
- ✦ Confirm the pattern
Use a second method to verify that the predicted points actually contain framing.
Understanding 16-Inch and 24-Inch Spacing
In U.S. wood framing, 16-inch and 24-inch on-center layouts are common. “On center” means the measurement runs from the center of one framing member to the center of the next.
These numbers are useful clues, not guarantees. Remodeling, unusual room shapes, roof design, load paths, and engineered framing can create different layouts.
- ✦ 16 inches on center
The centers of adjacent joists are 16 inches apart.
- ✦ 24 inches on center
The centers of adjacent joists are 24 inches apart.
How to Find Ceiling Studs by Tapping the Ceiling
Tapping is an old but useful method. It works by listening for changes in sound as you move across the ceiling. A spot backed by framing often sounds more solid than a hollow area between joists.
Use your knuckle or the handle of a small tool and tap lightly. Move in a straight line and compare nearby sounds. A change from a hollow sound to a firmer sound can suggest that framing is behind the surface.
Sound alone is not a precise measurement. Different ceiling materials can change the result, and insulation may make the difference hard to hear. Use tapping as a quick clue, then confirm the location before drilling.

- ✦ Tap lightly
A gentle tap is enough to compare the sound in nearby areas.
- ✦ Compare nearby spots
The method works by noticing changes in sound rather than one specific sound.
- ✦ Confirm before drilling
Use another method because tapping cannot precisely show the joist center.
When Tapping Works Best
Tapping can be useful on simple drywall ceilings with little texture. It is less reliable on thick plaster, heavily textured surfaces, or ceilings with insulation close to the finish.
It is a good first check when you have no special tools. Pairing it with measurements or a magnet can make the result much more useful.
- ✦ Simple drywall
Sound changes may be easier to notice on a flat drywall ceiling.
- ✦ Minimal tools
You only need your hand or a small object for a basic sound check.
How to Find Ceiling Studs in Different Ceiling Types
The best way to find ceiling studs can change with the ceiling material. A flat drywall ceiling is often easier to scan than a textured or plaster ceiling. An unfinished garage ceiling gives you a different advantage because the framing may already be visible.
Before choosing a method, look at the surface and the space above it. If the framing is exposed, you may not need a stud finder at all. If the ceiling is finished, use a method that fits the material and confirm the result before making a hole.

- ✦ Drywall
Try an electronic stud finder, magnet, measurements, or a combination of methods.
- ✦ Plaster
A magnet, careful measurements, and visual clues may be more useful than some electronic scanners.
- ✦ Textured ceiling
Keep a detector steady and consider using a magnet or measurements to confirm its reading.
- ✦ Unfinished ceiling
Look directly for joists or trusses and measure their spacing.
- ✦ Garage ceiling
Exposed framing may make the joist layout easy to see, but finished garage ceilings may need the same methods as interior rooms.
Finding Joists in a Garage
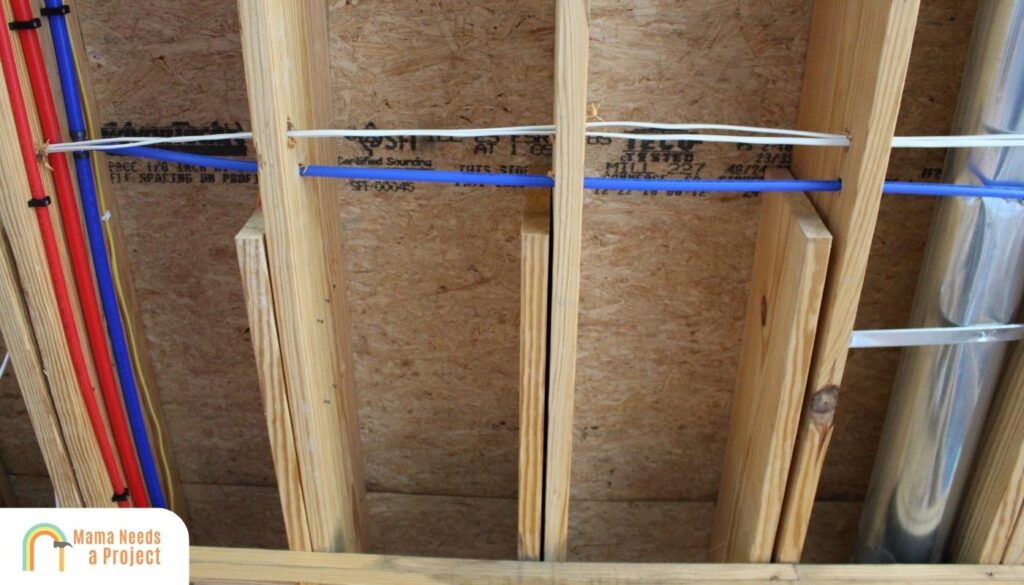
Garages often make ceiling framing easier to inspect. If the ceiling is unfinished, you can see the joists or trusses and measure their spacing directly. If the ceiling has drywall, use a stud finder or magnet and confirm the result.
Garage ceilings can also have utilities above them. Never assume an open area is safe to drill just because you cannot see a pipe or wire from below.
- ✦ Check the framing
Use visible joists as reference points when the garage ceiling is unfinished.
- ✦ Watch for utilities
Wires, pipes, ducts, and other systems may run near the ceiling framing.
How to Confirm a Ceiling Joist Before Drilling
Finding a likely joist is only part of the job. Before drilling, confirm the location and check the area for possible wiring, plumbing, ducts, and other hazards. A stud finder may detect some metal or electrical features, but it should not replace safe installation practices.
One useful approach is to combine methods. For example, you might locate a line of fasteners with a magnet, predict the joist position with measurements, and then confirm the area with a stud finder. When all three point to the same place, you have stronger evidence than any one method provides.
If the item is heavy or safety-critical, do not rely on a guess. Check the manufacturer’s mounting instructions and consider having a qualified professional inspect the framing when access is limited or the structure is unclear.
- ✦ Use two methods
Confirm the suspected joist with more than one locating method whenever practical.
- ✦ Check for hazards
Consider wires, pipes, ducts, and other systems that may be hidden above the ceiling.
- ✦ Match the fastener to the load
Use a fastener and mounting method that suit the framing, item, and manufacturer’s instructions.
- ✦ Do not trust one reading
A single detector signal or magnetic spot does not prove the exact joist location.
A Small Test Hole as a Last Resort
If non-invasive methods do not give a clear answer, a very small test hole can sometimes help confirm the material behind the ceiling. Choose the location carefully and use a tool that limits depth so you do not blindly drive into hidden systems.
This approach is not ideal for finished ceilings, and it does not remove the need to think about wiring or plumbing. Patch the hole after you confirm the framing, or use an existing opening when possible.
- ✦ Keep it small
Use the smallest practical opening when a test hole is necessary.
- ✦ Control depth
Avoid driving a bit or fastener deep into an unknown ceiling cavity.
- ✦ Use existing openings
An existing light or access opening may provide a safer way to inspect the framing.
Common Mistakes When Finding Ceiling Studs
Learning how to find ceiling studs is easier when you know what can go wrong. The most common mistake is treating a single clue as proof. A stud finder can be helpful, but surface texture, framing type, and hidden materials can affect its reading.
Another mistake is assuming every ceiling follows a perfect spacing pattern. Even when joists appear to be 16 or 24 inches apart, openings, beams, trusses, and changes in framing can alter the layout.
Finally, avoid drilling simply because you found a likely joist. A correct framing location does not automatically mean the planned fastener, screw length, or attachment method is safe for the load.
- ✦ Mistake: trusting one method
Fix this by confirming important locations with a second method.
- ✦ Mistake: assuming standard spacing
Fix this by checking the actual ceiling rather than relying only on a 16-inch or 24-inch pattern.
- ✦ Mistake: ignoring hidden utilities
Fix this by considering electrical, plumbing, HVAC, and other systems before drilling.
- ✦ Mistake: using the wrong fastener
Fix this by matching the fastener and mounting hardware to the framing and the item’s weight.
- ✦ Mistake: confusing joists with beams
Fix this by identifying the type of framing you found and understanding how the load will be supported.
When You Should Stop and Get Help
Stop if you cannot tell what is behind the ceiling or if the planned installation carries a serious safety risk. This is especially important for heavy fixtures, ceiling fans, structural work, or changes near electrical and plumbing systems.
A qualified contractor, electrician, or other appropriate professional can inspect the structure and choose a mounting method suited to the job. The cost of expert help can be small compared with repairing structural, electrical, or water damage.
- ✦ Heavy loads
Get expert guidance when the item needs substantial structural support and you cannot verify the framing.
- ✦ Unknown construction
Ask for help when the ceiling uses unusual framing or materials that you cannot identify.
- ✦ Electrical work
Use an appropriately qualified professional when the project involves changing electrical wiring or connections.