How to Find Studs Behind Tile: A Simple Guide for Safe Drilling
Learning how to find studs behind tile can feel hard because you cannot see the wall framing. Tile, thinset, cement board, and other layers can hide the usual clues. The good news is that you can often find a stud without removing the tile.
The safest approach is to use more than one clue. A magnetic finder can locate fasteners. Measurements can show likely stud spacing. A stud finder can add another check. If you plan to mount a heavy shelf, grab bar, cabinet, or other load, take time to confirm the location before you drill.
In many U.S. homes, wood wall studs sit behind drywall or tile backer at regular spacing. But remodels can have unusual framing, metal studs, extra blocking, or several layers of wall material. That is why a single reading should not be treated as proof.

Why Finding Studs Behind Tile Takes More Care
A normal drywall wall is easy to scan and tap. Tile changes the job. The tile itself is hard, and the layers below it may include thinset, cement board, drywall, or a mortar bed.
These layers can make an electronic stud finder less reliable. They can also make simple tapping tests hard to read. When learning how to find studs behind tile, think of the task as finding several clues that point to the same spot.
The goal is not just to locate wood. You also need to know what sits between the tile and the stud. That matters when you choose a drill bit, screw length, and mounting method.
- ✦ Tile hides fasteners
Screws or nails may sit below the tile and backer, so you cannot see them directly.
- ✦ Wall layers vary
A tiled wall may have drywall, cement board, plywood, or mortar behind the tile.
- ✦ Framing is not always standard
Older homes and remodeled walls may have framing that does not follow common stud spacing.
What a Stud Does
A wall stud is a vertical framing member inside a wall. Wood studs support wall materials and can provide a solid place to anchor heavy items.
Many modern U.S. walls use studs spaced about 16 inches on center. Some walls use 24-inch spacing, and small areas may have added blocking or different framing.
- ✦ Wood studs
Wood gives a strong anchor when you use a screw of the correct size and avoid damaging hidden utilities.
- ✦ Metal studs
Metal framing can look similar from the surface but needs a different mounting method for many loads.
The Best Tools for Finding Studs Behind Tile
You do not need a large tool kit to start. A strong magnet, tape measure, pencil, and flashlight can reveal useful clues. An electronic stud finder can provide another check when the wall surface allows it.
For a high-stakes mount, use several methods together. This is one of the most useful lessons when figuring out how to find studs behind tile: confirmation is more valuable than one clever trick.
If the wall has thick stone, dense porcelain, metal lath, or many layers, no basic stud finder should be treated as perfectly reliable.

- ✦ Strong magnet
A magnet can find steel screws or nails hidden beneath tile and backer. A line of fasteners can help reveal a stud.
- ✦ Electronic stud finder
Some models can detect changes in density through wall coverings. Results may vary with tile thickness and wall construction.
- ✦ Tape measure
Measurements from corners, door openings, or known framing points can help estimate where other studs should be.
- ✦ Flashlight
A bright light can help reveal subtle changes, trim clues, or surface details near the tiled area.
Why a Magnet Can Work So Well
A magnet does not detect the wood itself. It detects metal fasteners. If screws or nails attach the backer board to a wood stud, finding several fasteners in a vertical line can point to the stud behind them.
Move the magnet slowly across the tile. Mark each spot where it pulls. A single hit is not enough. Several aligned hits give you a much stronger clue.
- ✦ Use a slow sweep
Move the magnet in small steps so you do not miss a weak attraction.
- ✦ Look for a pattern
Several fasteners arranged vertically are more useful than one isolated magnetic spot.
How to Find Studs Behind Tile With a Magnet
A magnet is one of the simplest ways to start. It can work even when an electronic tool struggles with thick tile or uneven wall layers.
Start near an area where you expect a stud. Move the magnet slowly from side to side. When it sticks or pulls toward the wall, mark the spot with removable tape rather than writing on the tile.
Continue moving up and down near that spot. If you find more metal points that form a straight vertical line, you may have found the fasteners attached to a stud.

- ✦ Step 1: Pick a test area
Choose a clear section of tile where you can move the magnet without hitting fixtures.
- ✦ Step 2: Sweep slowly
Move the magnet in short passes from side to side and then up and down.
- ✦ Step 3: Mark each hit
Use small pieces of painter’s tape to mark magnetic spots without marking the tile.
- ✦ Step 4: Check the line
Several fasteners in a vertical line are a stronger sign of a stud than one magnetic hit.
- ✦ Step 5: Confirm the location
Compare the magnetic line with framing clues, stud spacing, and other evidence before drilling.
How to Find Studs Behind Tile With a Stud Finder
An electronic stud finder can help, but tile changes how the tool reads the wall. Thick tile and dense backing can reduce the useful range of some devices.
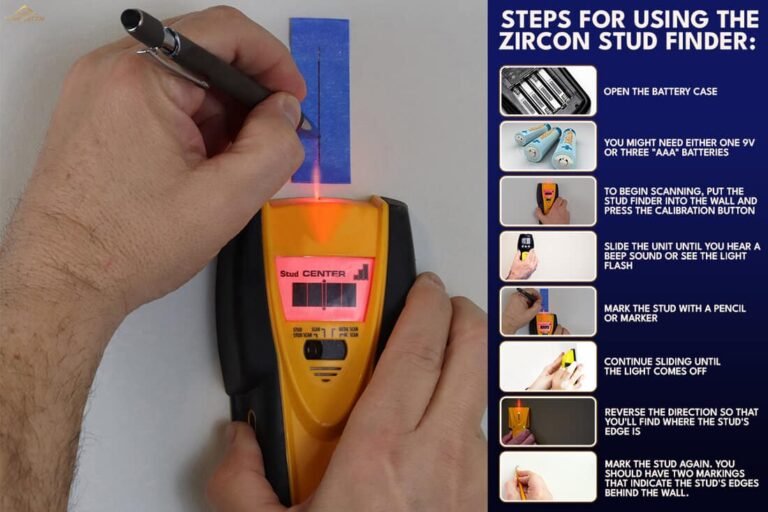
Read the tool manual before scanning. Some models need calibration on the wall. Others work best when moved at a steady speed over a clean surface.
When learning how to find studs behind tile with an electronic tool, scan from several directions. Then compare the reading with your magnet results. Agreement between the two methods gives you more confidence.

- ✦ Calibrate as directed
Follow the manufacturer’s calibration steps. Incorrect calibration can produce misleading readings.
- ✦ Move at a steady pace
A slow and even pass makes it easier to notice where the tool changes its reading.
- ✦ Scan more than once
Repeat the scan from nearby starting points and compare the results.
- ✦ Confirm with another method
Use a magnet or framing measurements to check the electronic reading.
When a Stud Finder Gives Strange Results
A stud finder may react to thick tile, metal mesh, pipes, wires, or changes in wall density. A wide or inconsistent reading does not always mean the stud is wide.
If the reading seems unusual, stop and use another method. A magnetic fastener pattern or known framing point can help you narrow down the location.
- ✦ Wide readings
Dense wall layers can make the detected area appear wider than the actual stud.
- ✦ Metal interference
Metal backer, lath, plumbing, or other metal parts can affect some electronic tools.
Use Wall Measurements and Construction Clues
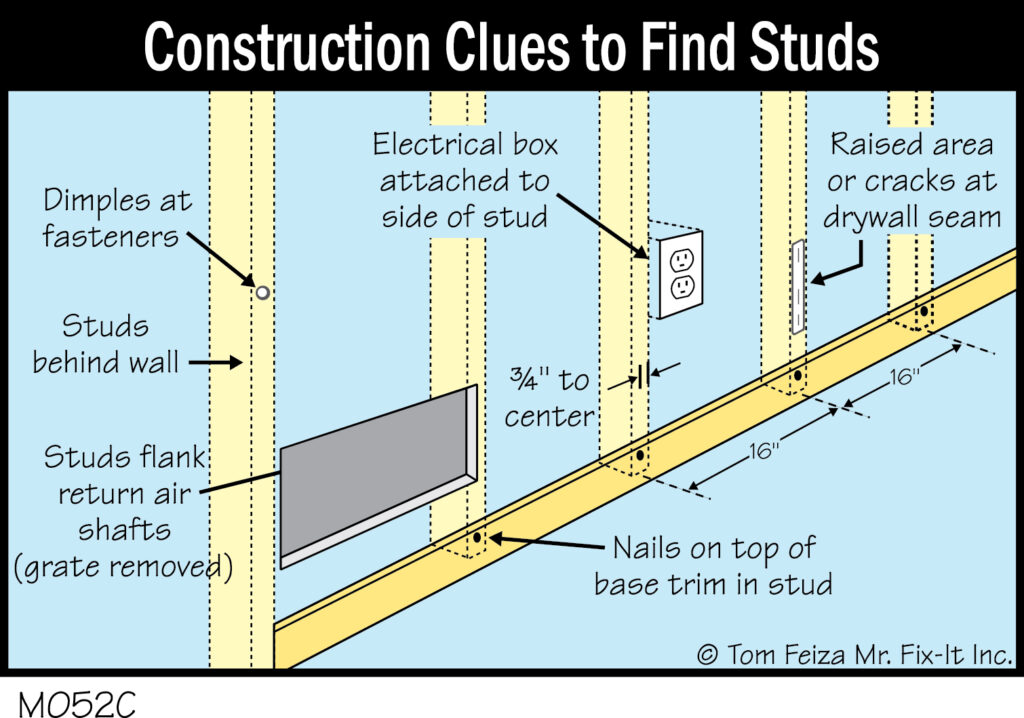
Sometimes the wall itself gives you a useful starting point. Corners, door openings, wall ends, electrical boxes, and other framed areas can help you estimate where studs are located.
Electrical boxes are often attached to framing, although their exact position varies. A box can therefore provide a clue about nearby framing rather than a guaranteed measurement.
Measure from a known point and look for a pattern. Do not assume that every wall follows the same spacing. Older homes and remodeled bathrooms can have surprises.
- ✦ Start at a corner
A corner usually has framing behind it, giving you a known reference point for measurements.
- ✦ Check door and window areas
Openings need framing, so their edges can provide useful clues about nearby studs.
- ✦ Look near electrical boxes
Many electrical boxes connect to framing, but the box location does not guarantee the exact stud center.
- ✦ Measure from more than one point
Comparing measurements can help catch errors caused by unusual framing or an incorrect starting point.
Understanding Stud Spacing
A common framing layout places studs 16 inches on center. This means the measurement runs from the center of one stud to the center of the next. Some walls use 24-inch spacing instead.
Treat these numbers as clues, not proof. A bathroom may have extra blocking for cabinets, grab bars, shelves, or plumbing fixtures.
- ✦ 16 inches on center
This is a common residential framing pattern, but it does not apply to every wall.
- ✦ 24 inches on center
Some walls use wider stud spacing, especially where the wall design and materials allow it.
How to Confirm a Stud Before You Drill
Finding a likely stud is only part of the job. Before drilling, confirm the position and think about what may be inside the wall.
This matters most in bathrooms and kitchens. Water lines, drain pipes, electrical cables, and other hidden parts may run through or near the framing. A stud location does not mean the space is automatically safe to drill.
For a heavy or safety-critical mount, check the plans or construction details if available. If you cannot confirm the wall layout, a qualified professional can inspect it before you make a hole.

- ✦ Use multiple clues
Confirm the location with at least two methods, such as magnetic fasteners plus measurements.
- ✦ Check the drill depth
Choose a screw and drill depth that fit the wall layers and the item you are mounting.
- ✦ Avoid utility paths
Consider nearby plumbing, electrical devices, pipes, and other hidden services before drilling.
- ✦ Use the right protection
Wear eye protection and follow the instructions for your drill, bit, anchors, and mounting hardware.
A Note About Bathroom Tile
Bathroom walls need extra care because plumbing is common. A stud may be exactly where you want to mount something, while a pipe or cable may still pass through the framing nearby.
If you are mounting a safety bar or another item that must hold a person, use proper structural support. Do not rely on a guess, a light-duty tile anchor, or a fastener that only grips the tile surface.
- ✦ Heavy loads need solid support
Items that carry substantial weight should attach to suitable framing or properly installed structural blocking.
- ✦ Safety bars need special care
A grab bar must have a secure structural attachment. Follow the product instructions and applicable building requirements.
How to Drill Through Tile Once You Find the Stud
Once you know where the stud is, you still need the right drilling method. Tile can crack if you use too much force, the wrong bit, or too much heat.
For ceramic or porcelain tile, use a drill bit made for the tile material. Start slowly and keep the drill steady. Do not use hammer mode while the bit is passing through the tile unless the tool and bit instructions specifically allow it.
After the bit passes through the tile and backer, the drilling method may change. The correct bit depends on whether you reach wood, metal, masonry, or another material.
:max_bytes(150000):strip_icc()/SPR-drilling-into-tile-6501004-02-574b96cb1b074f11b12993a96b83870b.jpg "Drilling a hole through tile with care")
- ✦ Mark the hole
Use painter’s tape or another tile-safe method to help keep the bit from wandering.
- ✦ Start slowly
Low speed and light pressure can reduce heat and help protect the tile.
- ✦ Use the correct bit
Choose a bit designed for the tile type and then use the proper bit for the material behind it.
- ✦ Keep the bit cool
Follow the bit maker’s instructions for cooling and drilling speed, especially during deeper holes.
- ✦ Do not force the bit
Excess pressure can crack tile or damage the bit.
How to Protect the Tile
Tile is hard but can be brittle. A sharp bit, slow speed, and controlled pressure give you more control than trying to push through quickly.
If the tile has a polished surface, painter’s tape can give the bit a little more grip at the start. Always test your method on a spare tile when possible.
- ✦ Keep the hole centered
A wandering bit can scratch the tile or leave an oversized opening.
- ✦ Watch for cracks
Stop if you see cracking, unusual movement, or damage around the drilling point.
Common Mistakes When Finding Studs Behind Tile
The most common mistake is trusting one clue. A magnet can find metal that is not part of a stud, and an electronic tool can react to materials that are not wood framing.
Another mistake is assuming that every stud is exactly where a measurement predicts. Standard spacing helps, but remodeling work can add blocking or change the framing pattern.
People also sometimes drill as soon as they find a likely location. Take one more moment to check the wall and think about hidden pipes and wires. That small pause can prevent a costly repair.
- ✦ Mistake: trusting one reading
Use more than one method when the exact location matters.
- ✦ Mistake: assuming standard spacing
Use common stud spacing as a guide, not as a guarantee.
- ✦ Mistake: drilling too fast
Fast drilling can crack tile, overheat the bit, or make it harder to control the hole.
- ✦ Mistake: ignoring wall utilities
Always consider plumbing and electrical systems before drilling into a wall.
A Simple Step-by-Step Method to Find Studs Behind Tile
If you want a simple process, start with the least invasive methods. The following approach combines a magnet, measurements, and a stud finder when available.
This method works best as a confirmation process. You are looking for several clues that agree, rather than trying to make one tool do everything.

- ✦ 1. Choose the mounting area
Pick the exact spot where the shelf, cabinet, fixture, or other item will go.
- ✦ 2. Find a known reference
Use a corner, opening, or other clear framing clue as a starting point.
- ✦ 3. Scan with a magnet
Look for several fasteners that line up vertically.
- ✦ 4. Check stud spacing
Compare the magnetic line with likely framing positions based on nearby known points.
- ✦ 5. Scan with an electronic finder
If your tool can work through the wall surface, use it to add another reading.
- ✦ 6. Mark the likely center
Mark the estimated stud center with painter’s tape so the mark can be removed later.
- ✦ 7. Check for hazards
Consider pipes, wires, fixtures, and other hidden services before drilling.
- ✦ 8. Drill with care
Use the correct tile bit, slow speed, controlled pressure, and suitable mounting hardware.