Why Is My Stud Finder Not Working? 11 Causes and Easy Fixes
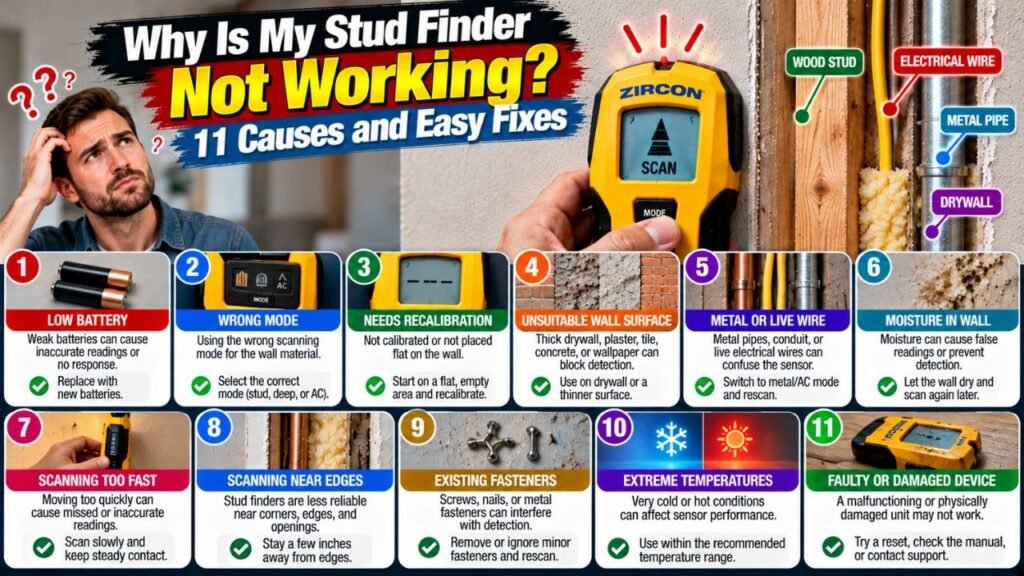
If you are asking, “why is my stud finder not working?”, the most common causes are incorrect calibration, a weak battery, scanning too quickly, starting directly over a stud, using the wrong scan mode, or trying to scan through a wall material the device cannot reliably penetrate. Metal, wiring, pipes, foil-backed insulation, plaster, tile, and uneven wall construction can also create false readings or prevent a stud finder from detecting studs correctly.
A stud finder that appears broken often is not actually defective. Many electronic models depend on detecting changes in wall density or capacitance, so technique and wall construction have a major effect on the result. A scanner that works perfectly on standard drywall may behave very differently on plaster, plywood, tile, an exterior wall, or a wall containing foil insulation.
The symptoms also vary. Your stud finder may beep everywhere, show no studs at all, repeatedly lose calibration, indicate studs that are not there, or continuously display a live-wire warning. Each symptom points toward a different possible problem.
In this guide, I’ll explain why stud finders stop working correctly, how to troubleshoot the most common problems, how calibration affects readings, which wall materials cause trouble, what to do when the finder beeps constantly, and how to safely confirm a stud before drilling.
Why Is My Stud Finder Not Working Correctly?
The first thing to understand is that different stud finders work in different ways.
A basic electronic stud finder usually senses changes in density behind the wall surface. More advanced scanners may detect stud edges, stud centers, metal, or energized electrical wiring. Magnetic stud finders work differently because they locate steel screws or nails used to fasten drywall to framing.
Because of these differences, the same troubleshooting method does not apply to every tool.
However, most stud finder problems come down to one of four areas: the device is not being calibrated correctly, the scanning technique is wrong, the wall construction is interfering with the sensor, or the device itself has a battery or hardware problem.
Before assuming that your stud finder is defective, test it on a simple interior drywall wall where you already know approximately where a stud is located. If it works there but not on your target wall, the wall construction is probably the real problem.
1. The Stud Finder Was Not Calibrated Properly
Incorrect calibration is probably the most common reason an electronic stud finder gives strange results.
Many electronic models establish a baseline reading when you first place them against the wall and activate them. The tool assumes that the starting location represents a normal section of wall.
If you accidentally begin directly over a stud, the finder may calibrate to the higher-density area. When you then move away from the stud, the device can become confused or fail to identify the stud properly when you scan back over it.
How to Calibrate a Stud Finder Correctly
Place the finder flat against the wall before turning it on unless your model’s instructions specify otherwise.
Hold it still during calibration.
Once calibration finishes, move slowly sideways while maintaining full contact with the wall.
If you receive confusing results, move several inches away and calibrate again.
Repeat the scan from the opposite direction.
A true stud location should generally produce repeatable readings rather than appearing once and disappearing during the next pass.
Some newer stud finders calibrate automatically, while others have different procedures for different scanning modes. That is why checking the instructions for your particular model is worthwhile.
2. You May Be Starting Directly Over a Stud
This problem is closely related to calibration but deserves separate attention because it can make a functioning finder appear completely useless.
Suppose the stud is directly behind the location where you place the scanner.
Some models may recognize that they started over a dense area and display an error or calibration warning. Other models may simply establish the wrong baseline.
Move approximately 6 to 12 inches to either side and try again.
If the tool suddenly begins detecting edges normally, the original starting position was probably over or very close to framing.
This is particularly common near corners, doors, windows, cabinets, and electrical boxes because these areas frequently contain additional framing.
Key Takeaways:
- Incorrect calibration can make a perfectly functional stud finder appear inaccurate.
- If readings make no sense, move several inches away, recalibrate, and scan from both directions.
3. The Battery Is Weak
A stud finder can power on while still having a battery that is too weak for reliable scanning.
A fading battery may cause inconsistent readings, dim indicators, weak tones, unexpected shutoffs, calibration failures, or unusual sensitivity.
This is especially easy to overlook because users often assume that if the display lights up, the battery must be fine.
That is not always true.
If your stud finder has become unreliable after working normally in the past, replacing the battery is one of the easiest troubleshooting steps.
Use the battery type specified by the manufacturer and make sure the contacts inside the battery compartment are clean and making solid contact.
If the device uses rechargeable batteries, make sure they are fully charged.
When Battery Replacement Is Especially Worth Trying
A battery is particularly suspect when the tool behaves differently from one scan to the next without any change in wall location.
For example, the finder might detect a stud during one pass, fail completely during the second, and then display an error on the third.
That inconsistency often points to power, calibration, or poor wall contact rather than the actual framing.
4. You Are Moving the Stud Finder Too Fast
Electronic stud finders need time to interpret changes behind the wall.
Sliding the device rapidly across the surface can cause it to miss stud edges or display readings in the wrong location.
Move slowly and steadily.
There is no advantage to racing across the wall.
Keep the scanner flat and maintain even contact as you move horizontally.
When the tool identifies a possible stud edge, stop and mark it lightly. Continue scanning until you find the opposite edge if your model supports edge detection.
Then scan the same area from the other direction.
Why Scanning From Both Directions Helps
A single pass can be affected by your hand position, wall texture, calibration point, or nearby objects.
Scanning left to right and then right to left gives you two independent measurements.
If both scans identify approximately the same edges, your confidence in the stud location increases considerably.
5. The Stud Finder Is Not Flat Against the Wall
Electronic stud finders generally work best when their sensing surface stays consistently against the wall.
If you tilt the finder, lift one edge, or pass over heavy wall texture without maintaining contact, the sensor’s relationship with the wall changes.
That can create false readings.
This issue is particularly common on textured drywall.
A heavily textured surface may make the scanner wobble. Moving the device over a thin sheet of cardboard can sometimes help some models glide more consistently, but you should first confirm that adding another layer is compatible with your stud finder and does not exceed its sensing capability.
Also keep your fingers where the manufacturer intends them to be. On some electronic models, wrapping your hand around the sensing area can affect readings.
6. You Are Using the Wrong Scan Mode
Many modern wall scanners have more than one mode.
A device might include settings such as:
Stud Scan
Deep Scan
Metal Scan
AC or live-wire detection
Those modes are designed for different purposes.
Using Deep Scan automatically on every wall does not necessarily improve accuracy. A deeper scan can sometimes detect more objects behind the surface, creating additional readings that are harder to interpret.
For ordinary drywall, start with the normal stud-scanning mode unless the manufacturer recommends something different.
Use a deeper mode when the wall covering is thicker than the standard mode can handle.
Metal mode can help when you are intentionally looking for metal framing, pipes, screws, or other metallic objects.
Edge Mode vs. Center Mode
Stud finders also differ in what they display.
Some locate the edges of a stud.
Others estimate the center.
If you have an edge-finding model and expect it to display the center immediately, you may think something is wrong when the tool is actually functioning exactly as designed.
Know what the indicator means before marking the wall.
7. Your Wall Material Is Confusing the Sensor
The type of wall you are scanning has a huge effect on performance.
Electronic stud finders generally perform best on standard drywall over conventional wood or metal framing.
Other wall materials can be much more difficult.
The following table shows why.
| Wall Surface | Typical Stud Finder Difficulty | Better Approach |
| Standard drywall | Low | Electronic finder usually works well |
| Thick drywall | Moderate | Deep mode may help |
| Plaster and lath | High | Magnet or advanced scanner |
| Plywood paneling | Moderate to high | Scanner plus fastener confirmation |
| Tile over drywall | Moderate to high | Deep scanner or other confirmation |
| Cement board | High | Metal/advanced scanner where appropriate |
| Foil-backed wall | Very high | Alternative locating methods |
| Concrete/masonry | Not a normal stud wall | Use appropriate wall scanner |
| RV laminated wall | Variable | Combine several locating methods |
Plaster and Lath
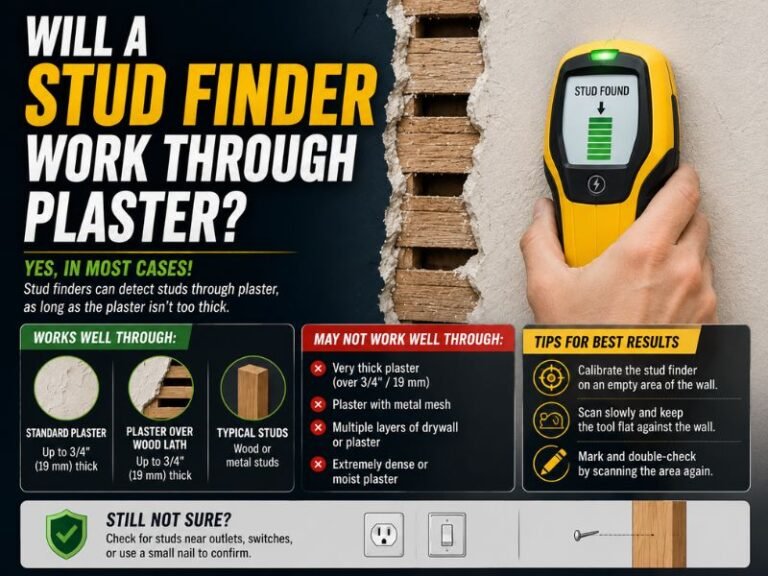
Plaster walls are one of the most common sources of stud finder frustration.
Older plaster walls may contain wood lath, metal lath, multiple layers of plaster, irregular thickness, or repairs made with different materials.
These create density changes everywhere, which can make a basic electronic scanner produce constant or inconsistent alerts.
For wood-lath plaster walls, a strong magnetic finder can sometimes be more dependable because it searches for the fasteners securing the lath to the studs.
If metal lath is present, magnetic detection can become much more difficult because large portions of the wall contain metal.
Plywood and Wood Paneling
A wall covered with plywood is already dense compared with standard drywall.
Some basic stud finders may struggle to distinguish the framing behind the panel from the panel itself.
Deep-scanning equipment may help, but you should still confirm the suspected framing location by another method before drilling.
Tile Walls
Tile, mortar, backer board, and framing create multiple layers for the scanner to interpret.
Some advanced wall scanners can work through certain tile assemblies, but performance varies substantially depending on thickness and material.
Do not assume that a scanner rated for drywall will work equally well through a tiled shower wall.
Foil-Backed Insulation
Metallic foil can interfere with electronic sensing because the foil forms a broad layer behind the wall instead of isolated framing.
If the tool reacts almost everywhere on an exterior wall but performs normally on interior drywall, foil-faced insulation or another conductive material may be contributing to the problem.
Key Takeaways:
- A stud finder that works on drywall may not work reliably through plaster, tile, plywood, cement board, or foil-backed materials.
- If the tool works on a simple test wall, the difficult wall construction is probably the problem rather than the scanner itself.
8. Your Stud Finder Keeps Beeping Everywhere
A finder that beeps constantly can be more frustrating than one that detects nothing.
Continuous alerts can have several causes.
The wall may contain metal framing, pipes, foil insulation, wiring, fasteners, or another material that continuously affects the sensor.
You may also have started over a stud or failed to calibrate correctly.
Another possibility is moisture.
Some electronic sensing technologies can be affected by differences in wall moisture because moisture changes the electrical characteristics of the material being scanned.
What to Do When It Beeps Everywhere
First, remove the finder from the wall and restart the scanning process in a different location.
Then test the tool on another simple interior wall.
If it works normally there, the device itself is probably functioning.
Return to the difficult wall and scan in several locations.
If the alerts continue across the entire area rather than appearing as narrow vertical bands, do not assume every alert represents a stud.
Try another locating method instead.
A strong magnet can be useful for drywall because it searches for fasteners rather than relying on density changes.
9. The Stud Finder Detects Live Wires Everywhere
Many advanced stud finders include an AC-wire warning feature.
This feature can be useful, but it should be treated as an additional warning system rather than a definitive electrical safety test.
A scanner may show widespread electrical alerts because of nearby energized wiring, wall moisture, metallic materials, electrical interference, or the way the user is holding or grounding the scanner.
Different models also have different sensing depths and limitations.
Never Use a Stud Finder to Prove a Wall Is Electrically Safe
This is important.
If the finder does not show an electrical warning, that does not guarantee there is no wire behind the wall.
Electrical detection can fail when a wire is:
too deep,
not energized,
shielded,
positioned differently than expected, or
outside the scanner’s detection capability.
Before drilling, consider the likely path of wiring.
Wires commonly run vertically or horizontally from switches, receptacles, lights, and electrical equipment.
Do not drill casually directly above, below, or beside electrical boxes simply because the stud finder does not show an AC warning.
10. Metal, Pipes, or Fasteners Are Creating False Stud Readings
A stud finder tells you that something has changed behind the surface. It cannot always tell you exactly what that object is.
A dense vertical reading might represent a wood stud.
But it could also be:
a metal stud,
a plumbing pipe,
electrical conduit,
metal reinforcement, or
another object inside the wall.
This is why blindly drilling into the exact center of every electronic reading is risky.
How to Tell Whether a Reading Is Probably a Stud
Check whether the reading continues vertically.
Scan the same location 6 to 12 inches higher and lower.
A structural stud usually follows a vertical path.
Then compare the location with other wall features.
Electrical boxes are commonly attached near studs, although that is not guaranteed. Door and window openings usually have framing around them. Baseboard fastening patterns may also offer clues.
If you use a magnet, look for several fasteners forming a vertical line.
Multiple consistent clues are much more convincing than one electronic beep.
11. The Stud Finder May Actually Be Faulty
Sometimes the tool really is the problem.
If you have replaced the battery, followed the correct calibration procedure, tested several scanning modes, maintained proper wall contact, and tried the scanner on a simple drywall wall with a known stud location, persistent failure may indicate a damaged sensor or internal electronic fault.
Signs of a potentially defective unit include random alarms in open air, failure to complete calibration on any wall, a display that behaves erratically with a new battery, or completely different results every time you repeat the same test.
Before replacing it, check the battery contacts and clean the sensing surface.
If the device still cannot detect a known stud under normal conditions, replacement may be more practical than continuing to troubleshoot it.
How to Reset a Stud Finder That Is Not Working
Most basic electronic stud finders do not have a complicated factory-reset procedure.
Instead, “resetting” usually means restarting and recalibrating the device.
Use this general process unless your manufacturer specifies another method:
- Remove the stud finder from the wall and release its activation button.
- Turn it off completely.
- Check or replace the battery if there is any doubt about its condition.
- Choose a different starting point on the wall, preferably several inches from the previous location.
- Place the finder flat against the wall.
- Activate it and keep it motionless while calibration completes.
- Move slowly horizontally without lifting or tilting the device.
- Repeat the scan from the opposite direction.
If your model has automatic calibration or a model-specific reset procedure, follow its instructions instead.
How to Test Whether Your Stud Finder Works
You can separate a wall problem from a tool problem with a simple controlled test.
Choose an ordinary interior wall covered with standard drywall.
Electrical receptacles are often mounted to framing, so the area beside an outlet can provide a useful starting clue. However, do not drill there just to test the finder because electrical wiring may be present.
Begin several inches away and scan horizontally.
A functioning finder should produce a relatively narrow, repeatable detection zone rather than random readings across the entire wall.
Mark the two sides if your device detects stud edges.
The distance between the edges should be reasonably consistent with the width of framing behind the drywall.
Repeat the test farther up the wall.
If the same vertical position is detected again, your stud finder is probably working correctly.
How to Find a Stud When the Stud Finder Will Not Work
If electronic scanning fails, you still have several useful options.
Use a Strong Magnet
A strong rare-earth magnet can locate the steel screws or nails securing drywall to framing.
Move the magnet slowly across the surface.
When it sticks or strongly pulls toward one location, mark that point.
Then search above and below.
Several fasteners aligned vertically provide strong evidence of a stud.
This is one of my favorite backup methods because it does not depend on electronic density sensing.
Look at Electrical Boxes
Electrical boxes are frequently attached to one side of a stud.
This can help establish the general framing layout.
However, newer construction can use adjustable or old-work boxes that do not attach to a conventional side stud, so treat the outlet as a clue rather than proof.
Look for Drywall Fasteners
Under certain lighting conditions, drywall screw locations may be visible as tiny depressions or raised spots.
Shining a flashlight almost parallel to the wall can make subtle imperfections easier to see.
A vertical row of fasteners may reveal the framing line.
Use Known Framing Patterns Carefully
Many residential walls use regularly spaced framing, commonly 16 or 24 inches on center.
Once you positively identify one stud, measuring to the next expected position can help narrow your search.
Do not treat spacing as proof.
Doors, windows, corners, plumbing walls, and other structural features can change the framing pattern.
How to Confirm a Stud Before Drilling
For a heavy shelf, television mount, cabinet, grab bar, or similar installation, confirmation matters more than speed.
I recommend locating the stud electronically, rescanning from both directions, and then using a second method such as a magnet.
If you detect the same vertical location at several heights and find drywall screws along that line, you can be much more confident that you have structural framing.
Also consider what may be inside the wall.
Plumbing and electrical systems can run through framing. A stud itself is not an automatic guarantee that every drilling location on it is safe.
Be Careful With Pilot Holes
A small pilot hole can provide final confirmation, but it should not be your first locating technique.
Know the approximate wall thickness and avoid unnecessarily long drill bits or screws.
A depth stop or a piece of tape on the drill bit can help control penetration when appropriate.
For areas where wiring or plumbing is likely, further inspection may be safer than exploratory drilling.
Important Tip: Never assume that a stud finder’s “no AC detected” indication proves it is safe to drill. Treat electrical detection as an additional warning feature, not as permission to drill blindly.
Key Takeaways:
- Confirm important stud locations with more than one method.
- A magnet, repeated vertical scans, and visible fastener patterns can help verify electronic readings.
- Always consider hidden electrical wiring and plumbing before drilling.
How to Get More Accurate Stud Finder Readings
The biggest improvements usually come from technique rather than buying a more expensive scanner.
Keep the sensing surface flat, move slowly, scan in both directions, and repeat the reading at several heights.
Do not press excessively hard. Steady contact is enough.
Also remove nearby objects that may interfere with scanning when practical. Large metal objects, electronics, or fixtures close to the wall can complicate some readings.
If your scanner provides a strength indicator, observe how the signal changes instead of treating every beep as an identical result.
For difficult walls, combine methods rather than repeatedly scanning the same spot and hoping for a different answer.
Should You Buy a Better Stud Finder?
Sometimes upgrading makes sense.
A basic edge-detecting finder is generally adequate for ordinary drywall and simple household projects.
A more advanced scanner can be worthwhile if you frequently work with different wall materials or need additional information about what is behind a wall.
Features that may help include center detection, deeper scanning, metal detection, and electrical warnings.
However, no electronic scanner can eliminate uncertainty in every wall.
Even an advanced model should be used with an understanding of its limitations.
If you only occasionally hang pictures or shelves on ordinary drywall, replacing a functioning basic finder with an expensive scanner may offer little benefit.
If you routinely mount cabinets, televisions, fixtures, or other heavy objects, better wall-scanning capability can be a worthwhile investment.
FAQs about Why Is My Stud Finder Not Working
Why does my stud finder not detect any studs?
The tool may have calibrated over a stud, have a weak battery, be moving too quickly, or be unable to scan through the wall material. Move to a new starting position, recalibrate, replace the battery if necessary, and test it on standard drywall.
Why does my stud finder beep everywhere?
Constant beeping can be caused by improper calibration, metal in the wall, foil insulation, wiring, moisture, or a wall material that interferes with the sensing technology. Test the finder on another wall to determine whether the problem follows the tool or stays with the wall.
Why does my stud finder keep saying AC?
The scanner may be detecting energized wiring or experiencing interference from conductive wall materials, moisture, or other electrical conditions. Do not ignore the warning, but also do not assume every AC alert identifies the exact location of a wire.
Why does my stud finder give different readings every time?
Inconsistent readings commonly result from weak batteries, inconsistent wall contact, scanning too quickly, recalibrating in different locations, or difficult wall construction. Repeat the scan slowly from both directions and at several heights.
Does a stud finder need to be calibrated every time?
Many electronic models require calibration whenever they are activated or moved to a new scanning area. Other models calibrate automatically. Follow the instructions for your specific device.
Can a stud finder stop working because of a low battery?
Yes. A weak battery can cause inconsistent detection, calibration errors, unexpected shutdowns, or weak indicators even if the device still powers on.
Why won’t my stud finder work on plaster walls?
Plaster may have variable thickness and can be installed over wood or metal lath. Those additional materials create density and metal patterns that confuse many basic electronic stud finders.
Why won’t my stud finder work through tile?
Tile walls may include tile, mortar, cement board, waterproofing, drywall, or other layers. The total thickness and density can exceed the sensing capability of a basic stud finder.
Can a stud finder detect metal studs?
Some can. Standard density-based models may detect the edges of metal framing, while scanners with dedicated metal modes are usually better suited to identifying metal. Check the capabilities of your particular model.
Can a magnet find studs better than an electronic stud finder?
On standard drywall, a strong magnet can be very dependable because it detects the steel fasteners used to attach the drywall to framing. It does not detect the wood itself, but several vertically aligned fasteners strongly suggest a stud location.
Should I start a stud finder on the stud?
Generally, no. Many models work best when calibration begins over an ordinary section of wall rather than directly over a stud. Some newer models can compensate automatically, but model-specific instructions should take priority.
Can moisture make a stud finder inaccurate?
Yes, certain electronic sensing methods can be affected by changes in wall moisture because moisture alters the electrical characteristics of the material being scanned.
Can a stud finder detect electrical wires?
Some models can warn of certain energized AC wiring, but detection has limitations. A negative reading does not prove that no electrical wiring is present.
How do I know whether my stud finder is broken?
Replace the battery and test it on a simple drywall wall where a stud location can be reasonably confirmed. If it repeatedly fails to calibrate or produces random results under normal conditions, the device may be defective.
What can I use instead of a stud finder?
A strong magnet is one of the best alternatives for drywall because it can locate metal fasteners attached to studs. Wall features, electrical boxes, drywall seams, fastener patterns, and construction measurements can also provide clues.
Conclusion
If you are wondering why is my stud finder not working, do not assume the device is broken immediately. Incorrect calibration, starting directly over a stud, a weak battery, scanning too quickly, poor wall contact, or using the wrong scan mode can all make a functioning stud finder behave unpredictably.
Wall construction is another major factor. Standard drywall is relatively easy to scan, while plaster, plywood, tile, cement board, foil-backed insulation, laminated walls, and walls containing substantial metal can confuse basic electronic sensors.
My recommendation is to start with the simplest fixes: install a fresh battery, move to a new starting point, recalibrate correctly, keep the tool flat, and scan slowly from both directions. Then test the finder on ordinary drywall. If it works there, your original wall is probably the challenge rather than the device.
For important mounting projects, do not rely on one beep or one scan. Confirm the location at several heights and use a second method, such as a strong magnet, whenever possible. Most importantly, remember that finding a stud does not automatically prove the area is free of electrical wiring or plumbing.
A stud finder is a locating aid rather than an absolute picture of everything inside the wall. When you use it with careful scanning, proper calibration, and a second confirmation method, you can locate framing much more reliably and avoid unnecessary holes or potentially expensive damage.