
Your Drill Has Secret Features Brands Rarely Explain
Your drill probably has more useful features than you realize, but they are not literally secrets that tool brands are hiding.
Many functions are documented in manuals yet receive little attention because users focus on voltage, torque, battery size, and maximum RPM. Clutch settings, mechanical gears, trigger control, spindle locks, electronic brakes, anti-rotation systems, and even angle-detection technology can completely change how a drill performs.
If you have only been pulling the trigger and switching between forward and reverse, you may be using a fraction of what your drill can do.
Some of these features are common on basic cordless drill/drivers. Others appear only on hammer drills or premium professional models. For example, current DEWALT drill/drivers document adjustable screw-driving modes, two mechanical speeds, variable-speed triggers, automatic spindle locks, electronic braking, and selectable LED modes. Bosch offers models with KickBack Control, electronic angle detection, configurable settings, and precision clutches, while Milwaukee and Makita offer their own electronic anti-rotation technologies on selected drills.
Here are the drill features worth checking before you buy another tool—or assume your current drill cannot handle a job.
Are Drill Brands Really Hiding Features?
Not exactly.
The better way to describe them is overlooked features.
Power-tool companies normally list important controls in product specifications and manuals. The problem is that many users never read those manuals. A clutch ring may look like nothing more than a numbered collar. A forward/reverse switch may appear to control direction only. A speed selector can be mistaken for a simple “fast/slow” switch without understanding that it also changes available torque.
Some premium electronics are even easier to miss because they may work automatically.
Bosch, for example, currently sells drill/drivers with KickBack Control and Electronic Angle Detection, while Milwaukee lists AutoStop Control Mode on selected M18 FUEL drills. Makita’s current high-output hammer drill technology includes Active Feedback-sensing Technology, which can shut the motor down when accessory rotation suddenly stops.
So there is no conspiracy inside your tool case. There may simply be controls you have never used correctly.
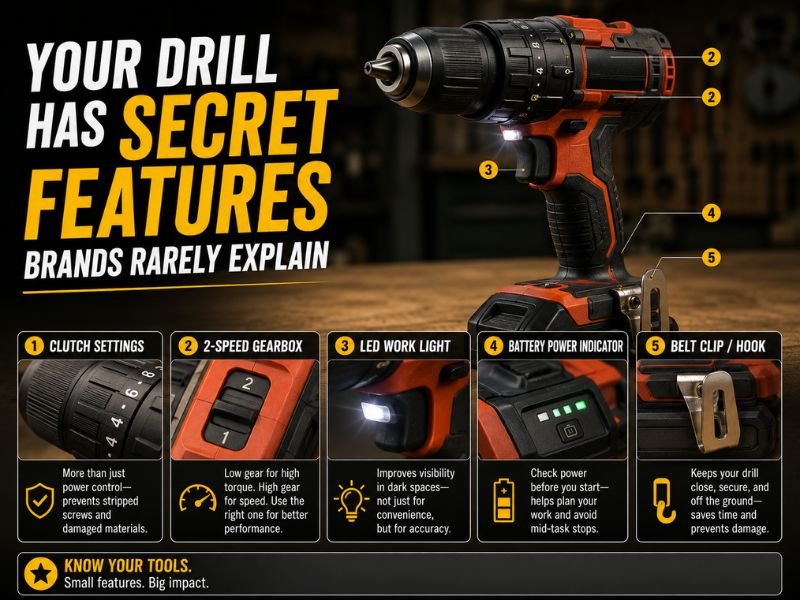
1. Those Numbers Behind the Chuck Are Not Speed Settings
One of the most misunderstood features on a drill is the numbered collar behind the chuck.
Those numbers usually control the clutch, not drill speed.
When the drill is in screw-driving mode, the clutch limits how much torque the tool applies before the drive mechanism begins slipping or electronically stops, depending on the design.
A lower number means a lower torque threshold. A higher number allows greater fastening force.
On the DEWALT DCD800/DCD805 platform, for example, the manufacturer documents 15 screw-driving torque positions and specifically recommends starting at a lower torque setting before increasing it to reduce the chance of damaging the fastener or workpiece.
Bosch currently offers models with 20, 25, or other clutch-setting configurations, depending on the drill. Its GSR18V-1330CN has 25 clutch positions intended to improve driving accuracy and reduce fastener damage.
When Should You Use the Clutch?
Use clutch settings when driving:
- Cabinet screws
- Wood screws
- Drywall-type fasteners where appropriate
- Hardware screws
- Small machine screws
- Furniture fasteners
- Screws where consistent depth matters
Suppose you are assembling cabinets. Running the drill in unrestricted drilling mode can sink one screw correctly and bury the next one below the wood surface.
A properly adjusted clutch helps create more consistent results.
Start low, test the fastener in scrap material if possible, and increase the setting until the screw seats at the desired depth.
2. Drill Mode Can Bypass the Clutch
Look at the collar again.
In addition to numbers, many drill/drivers have a drill-bit symbol. That position usually places the tool in drilling mode rather than torque-limited screw-driving mode.
This distinction matters.
DEWALT’s current DCD800/DCD805 instructions state that when the tool is placed in drilling or hammer-drilling mode, the clutch does not function as it does in screw-driving mode. The manufacturer also warns that a stalled drill can produce sudden twisting reaction.
Use drilling mode for tasks such as:
- Twist-bit drilling
- Spade bits
- Hole saws within tool capacity
- Brad-point bits
- Metal drilling
- Other continuous drilling applications
Do not automatically use drill mode simply because you want “more power” while installing small screws. You lose the torque-limiting benefit of the clutch.
3. The Gear Selector Changes More Than Speed
Most modern drill/drivers have a mechanical gear selector marked 1 and 2.
Many owners think:
- 1 = slow
- 2 = fast
That is true, but incomplete.
Gear 1 normally provides lower rotational speed with greater torque capability, while Gear 2 provides higher speed with less torque multiplication.
DEWALT documents speed 1 on the DCD800/DCD805 as its higher-torque range and speed 2 as its higher-speed range. Bosch similarly describes the two-speed gearbox on its GSR18V-1330CN as a high-torque range up to 550 RPM and a high-speed drilling range up to 2,200 RPM.
Use Gear 1 For
- Large drill bits
- Hole saws
- Large fasteners
- Dense material
- Applications requiring high torque
- Slow, controlled starts
Use Gear 2 For
- Smaller drill bits
- Faster drilling
- Light screw driving
- Jobs where torque demand is relatively low
Trying to drill a very large hole in high gear can cause the drill to bog down or stall. Using low gear allows the transmission to trade speed for mechanical advantage.
One important rule: do not shift mechanical gears while the drill is running. DEWALT’s instructions specifically tell users to allow the drill to stop before changing speed ranges.
4. Your Trigger Is a Precision Speed Control
The trigger is not simply an on/off switch.
Most cordless drills use a variable-speed trigger. Press lightly and the chuck turns slowly. Press farther and the motor accelerates.
DEWALT documents this directly on its current drill/driver platform: trigger travel controls operating speed.
This is especially useful when starting:
- A screw without a pilot recess
- A drill bit on metal
- A large wood bit
- A countersink
- A fastener that needs careful alignment
Instead of immediately pulling the trigger fully, begin slowly until the bit establishes itself.
The mechanical gear selector determines the available speed range; the trigger controls speed within that range.
Those two controls work together.
5. The Reverse Switch May Also Be a Trigger Lock
The forward/reverse switch usually has a third position that many users overlook.
Push it halfway or into its centered position, and it can act as a lock-off that prevents the trigger from operating.
DEWALT explicitly documents the center position of its forward/reverse control as an off-position lock.
That is useful when:
- Carrying the drill
- Installing a bit
- Storing the tool temporarily
- Working in a tool bag
- Preventing accidental trigger activation
For greater safety when changing accessories, however, follow your manual’s instructions and remove the battery where required. DEWALT instructs users to turn the tool off and remove the battery before installing or removing accessories.
The center lock should not be treated as a substitute for every battery-removal instruction.
6. Your Chuck May Have an Automatic Spindle Lock
Have you ever wondered why you can sometimes tighten a cordless drill chuck with one hand?
Some drills contain an automatic spindle-lock mechanism.
When the motor is stopped, the spindle locks, allowing the user to rotate the chuck sleeve without needing a chuck key or a second wrench.
DEWALT documents an automatic spindle lock on its DCD800/DCD805 drills specifically for opening and closing the keyless chuck.
This is much more useful than trying the old shortcut of holding the chuck and briefly pressing the trigger.
In fact, DEWALT warns against attempting to tighten an accessory by gripping the front of the chuck while operating the drill because doing so can cause injury or damage.
Use the chuck as its manufacturer intended.
7. The Drill May Stop Faster Than You Expect Because of a Brake
Release the trigger on many modern cordless drills and the chuck stops quickly rather than coasting.
That is often an electronic brake.
The DEWALT DCD800/DCD805 manual states that the drill has a brake and that the chuck stops when the trigger is fully released.
Why is that useful?
It improves control when:
- Driving screws to a precise depth
- Moving rapidly between fasteners
- Working close to a finished surface
- Stopping a spinning accessory before repositioning
It also changes how a modern cordless drill feels compared with older tools that continue spinning noticeably after trigger release.
8. Your LED May Be More Than a Work Light
The small light near the battery or chuck may have functions you have never used.
Some drills offer adjustable brightness, delayed shutoff, positioning, or even dedicated spotlight modes.
DEWALT currently offers drill/drivers with a pivoting LED work light. On the DCD800/DCD805 design, the LED can operate in selectable modes, and its spotlight setting can remain illuminated for up to 20 minutes after trigger release. The system also provides a low-battery warning while in spotlight mode.
That means your drill can occasionally double as a useful temporary work light when:
- Working inside cabinets
- Looking behind an appliance
- Drilling between joists
- Working in an electrical panel area after appropriate electrical safety measures
- Finding hardware in a dark workspace
Check the switch near the base of the tool. You may have multiple light modes without realizing it.
9. Some Drills Can Detect Dangerous Bind-Up
This is one of the most important premium features appearing on modern high-torque drills.
Large drill bits can catch or bind. When the bit suddenly stops but the motor continues trying to rotate, the drill body can react violently in the opposite direction.
Some manufacturers now use electronic systems designed to detect that condition.
Milwaukee AutoStop
Milwaukee’s current M18 FUEL 1/2-inch drill/driver includes AutoStop Control Mode, which the company says can stop the tool when excessive rotation is detected during a bind-up event. A dedicated indicator light identifies an AutoStop event.
Bosch KickBack Control
Bosch’s GSR18V-1330CN includes KickBack Control, designed to reduce risk associated with sudden rotational torque reaction when an accessory binds.
Makita AFT
Makita’s Active Feedback-sensing Technology on selected drills is designed to shut down the motor when accessory rotation is suddenly forced to stop.
These systems do not mean you can ignore proper drilling technique. They are additional controls, not permission to use oversized accessories, poor body position, or one-handed operation where the manufacturer requires better support.
Always check your own model. Anti-rotation technology is not present on every cordless drill.
10. Some Drills Can Tell Whether You Are Drilling Straight
This is where modern drill technology begins to feel surprisingly advanced.
Selected Bosch professional drills have Electronic Angle Detection.
The current GSR18V-1330CN can provide angle control for drilling or installing long fasteners, and Bosch states that its connected features can allow users to configure specific angles through the PRO360 system when the appropriate connectivity hardware is installed.
This can be useful when drilling:
- Through framing
- Joists
- Structural lumber
- Repetitive angled holes
- Long fastener installations where angle consistency matters
It is not a standard feature across the drill market, but it shows how much electronic control has been added to tools that still look like conventional drills from the outside.
11. Your Drill May Have App Connectivity
Bluetooth and tool apps are not limited to speakers and trackers.
Certain professional drills can connect to manufacturer software for configuration, feedback, or asset-management functions.
Bosch’s connected-ready GSR18V-1330CN can communicate with the PRO360 app when the optional module is installed, allowing supported setting customization and feedback.
Selected DEWALT drills include a pocket for the company’s Tool Connect chip, which can integrate with its jobsite asset-management system.
Milwaukee also sells drill models within its ONE-KEY ecosystem, which adds digital tool-management functions on compatible products.
Not every connected drill offers the same controls. Some systems focus on configuration, while others are more about inventory and tool management.
Check exactly what your model supports before buying a connectivity module or accessory.
12. Hammer Mode Is Not “Extra Power” for Every Job
If your drill has a hammer symbol, you own a hammer drill/driver rather than a basic drill/driver.
Hammer mode introduces a rapid axial percussion action while the chuck rotates. Its intended purpose is drilling suitable masonry materials with the appropriate bit.
Makita describes the hammer-drill mode on its current models as adding percussive motion for drilling concrete or masonry. DEWALT likewise directs users to the hammer-drilling mode for appropriate masonry applications.
Do not use hammer mode simply because a normal hole is drilling slowly.
For wood and most metal drilling, use the normal drilling mode unless the accessory and manufacturer instructions specify otherwise.
Hammer mode also does not turn a standard hammer drill into a rotary hammer. Those are different tool classes intended for different levels of masonry work.
13. Brushless Electronics May Be Protecting the Tool Automatically
Modern brushless drills often contain electronics that do more than control the motor.
Bosch lists Electronic Motor and Cell Protection on several current drill/driver models to help protect the tool and battery against overload or overheating conditions. Milwaukee describes REDLINK PLUS electronics on its current M18 FUEL drill as monitoring performance and protecting against overload, heat, and excessive discharge conditions. Makita similarly uses electronic communication in its XGT platform to monitor overload, over-discharge, and overheating.
This can explain why a cordless drill sometimes shuts down even though the battery still appears to contain energy.
The correct response is not necessarily to keep squeezing the trigger.
A shutdown may indicate:
- Excessive load
- Excessive temperature
- Battery protection
- Accessory bind-up
- Another electronic protection event
Stop and determine the cause according to the tool’s manual.
Which Drill Features Are Common and Which Are Premium?
| Feature | Common on Many Drills? | Typical Purpose |
| Variable-speed trigger | Yes | Fine speed control |
| Forward/reverse | Yes | Driving and removing fasteners |
| Center trigger lock | Common | Prevent accidental activation |
| Adjustable clutch | Common on drill/drivers | Control screw-driving torque |
| Mechanical speed 1/2 | Common | Choose torque vs speed |
| Keyless chuck | Very common | Fast accessory changes |
| Electronic brake | Common on modern cordless tools | Faster stopping |
| LED work light | Very common | Illuminate work area |
| Hammer mode | Hammer drills only | Masonry drilling |
| Anti-kickback control | Selected models | Reduce bind-up reaction |
| Angle detection | Selected premium models | Drill/drive at target angles |
| App connectivity | Selected models | Configuration or management |
| Spotlight mode | Selected models | Extended work lighting |
The exact feature set varies substantially by model, even within the same brand.
How to Discover the Features on Your Own Drill
Before buying another drill because yours seems limited, inspect the tool carefully.
Start by finding the exact model number. Two drills that look almost identical may have different electronics, clutch settings, or modes.
Then check:
The collar behind the chuck: Look for numbers, a drill-bit symbol, and possibly a hammer symbol.
The top of the gearbox: Look for a 1/2 or 1/2/3 mechanical speed selector.
The forward/reverse switch: Test whether the center position locks the trigger.
The base of the handle: Look for light switches, mode buttons, Bluetooth indicators, or anti-rotation controls.
The battery: Check whether it includes a charge gauge or status indicator.
The side handle: If your drill came with one, do not assume it is optional decoration. High-torque drilling can create significant reaction forces.
Finally, read the model-specific manual. That is where less obvious functions such as spotlight modes, clutch behavior, automatic spindle locks, electronic protection, and control indicators are normally explained. DEWALT’s current manual, for example, documents several functions that would be easy to miss just by looking at the exterior of the tool.
Mistakes That Make a Good Drill Feel Weak
Sometimes the problem is not the drill. It is the setting.
Using High Gear for a High-Torque Job
High speed is excellent for many smaller drilling operations, but large holes may require low gear.
Leaving the Clutch on a Low Number
If the drill repeatedly clicks or stops while driving a large screw, the clutch may simply be set too low.
Increase it gradually rather than immediately switching to unrestricted drilling mode.
Using Drill Mode for Delicate Fastening
Without clutch control, it is easier to overdrive a screw or damage the workpiece.
Using Hammer Mode on the Wrong Material
Hammer mode is intended for appropriate masonry drilling, not as a universal performance booster.
Ignoring a Protection Shutdown
If an anti-kickback or overload system stops the drill, determine why before restarting.
Assuming Maximum Trigger Equals Maximum Performance
Large bits frequently benefit from lower speed and controlled pressure. More RPM is not automatically better.
Frequently Asked Questions
What Are the Numbers on a Drill For?
The numbers around the collar usually represent clutch settings for screw driving. Higher numbers generally allow more torque before the clutch intervenes. On DEWALT’s DCD800/DCD805, for example, settings 1 through 15 are used for screw-driving torque control.
What Does 1 and 2 Mean on Top of a Drill?
They usually select mechanical gearbox ranges. Gear 1 provides lower speed and greater torque capability, while Gear 2 provides higher rotational speed for faster drilling and lighter-load work.
What Does the Drill-Bit Symbol Mean?
It selects drilling mode. On many drill/drivers, this bypasses the normal screw-driving clutch so the drill can deliver continuous torque for drilling.
What Does the Hammer Symbol Mean?
On a hammer drill/driver, it engages the percussion mechanism used for drilling appropriate masonry materials with the correct bit.
Why Does My Drill Stop Suddenly?
Possible causes include a discharged battery, overload protection, overheating, a low clutch setting, or—on some premium models—an electronic anti-rotation system responding to a bind-up. Check your model’s indicators and manual before assuming the drill is defective.
Why Does My Drill Keep Clicking When Driving a Screw?
If it occurs in screw-driving mode, the clutch may have reached its selected torque threshold. Raise the clutch setting gradually if the fastener legitimately requires more torque.
Can the Reverse Switch Lock the Drill?
On many models, yes. The center position of the forward/reverse control can lock the trigger. DEWALT documents this function on its DCD800/DCD805 platform.
Does Every Drill Have Anti-Kickback Technology?
No. Electronic anti-rotation systems such as Bosch KickBack Control, Milwaukee AutoStop, and Makita AFT appear on selected models rather than every drill.
Can a Drill Really Connect to a Phone?
Some can. Selected Bosch drills support connected configuration and feedback, while tool-management systems are available on compatible models from other professional brands.
Conclusion
Your drill has “secret features” only in the sense that many of its most useful controls are easy to overlook. Brands generally document these functions, but clutch rings, mechanical gears, trigger locks, spindle locks, electronic brakes, LED modes, and protection systems rarely get as much attention as voltage and maximum torque.
Start with the features found on ordinary drill/drivers. Learn how the clutch controls fastening torque, why low gear is useful for demanding work, how the variable trigger gives you precise speed control, and when drilling mode should replace screw-driving mode.
Then check whether your particular drill goes further.
Modern professional models can add anti-rotation protection, electronic angle detection, extended spotlight modes, battery and motor protection, app connectivity, and other electronic controls. Bosch, Milwaukee, Makita, and DEWALT all currently offer drills with examples of these advanced functions, although availability varies by model.
Before deciding your drill is too weak, too basic, or missing a capability, find the model number and read the manual. You may discover that the feature you thought required another tool has been sitting under your hand the entire time.
