Remove Hard Water Stains with a Power Drill: Safe Cleaning Guide
You can remove hard water stains with a power drill when the stained surface can safely tolerate mechanical scrubbing and you use a soft, non-scratching brush at controlled speed. A drill brush can reduce the effort required to loosen stubborn mineral buildup on some durable surfaces, but it is not appropriate for every shower door, faucet finish, acrylic tub, natural stone surface, or coated fixture.
Hard water contains elevated levels of dissolved minerals, primarily calcium and magnesium. As water repeatedly wets a surface and evaporates, mineral deposits can accumulate on bathroom tile, around plumbing fixtures, inside sinks, and in other frequently wet areas. The U.S. Geological Survey notes that hard water can create mineral scale on plumbing fixtures, pipes, and water-heating equipment.
The most important part of learning how to remove hard water stains with a power drill is not choosing the most aggressive brush or running the drill at maximum speed. It is matching the cleaner, attachment, pressure, and technique to the material underneath the stain. The wrong combination can turn a cleaning problem into scratched glass, dulled acrylic, etched stone, or damaged faucet finishes.
This guide explains when a drill brush makes sense, which surfaces require caution, how to clean safely, what mistakes to avoid, and how to keep mineral deposits from returning as quickly.
What Are Hard Water Stains?
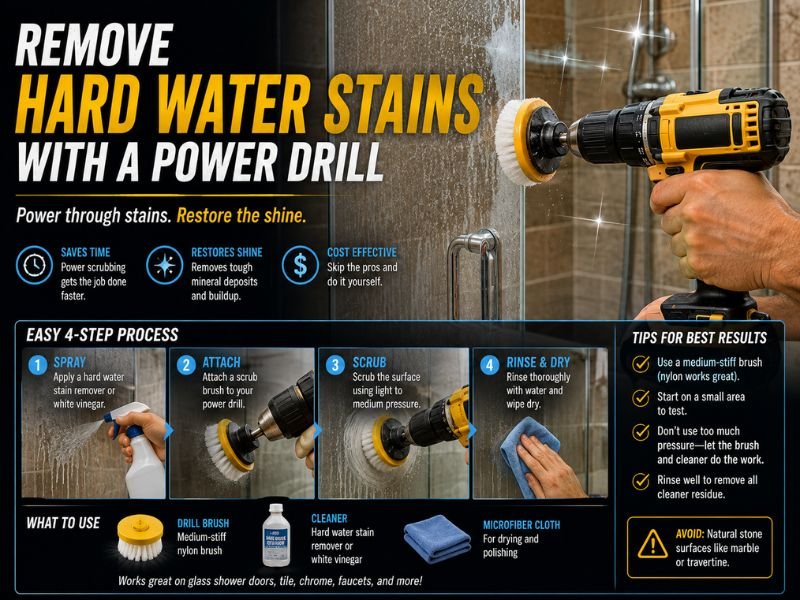
Hard water stains are mineral deposits left behind after water containing dissolved minerals evaporates.
Hardness is primarily associated with calcium and magnesium dissolved in the water. USGS explains that these minerals can interfere with soap performance and can form scale deposits on fixtures and plumbing systems.
Around a home, mineral buildup can appear as:
- White or cloudy spots
- Chalky residue
- Rough scale around faucets
- Crusty deposits along tile edges
- Cloudy shower surfaces
- Rings around drains
- Deposits around showerheads
- Mineral film on sinks and tubs
Hard water deposits can also combine with soap residue, body oils, dirt, and cleaning-product residue. That mixture may be more difficult to remove than fresh water spots alone.
A power drill does not chemically dissolve the minerals. Instead, a compatible brush attachment provides mechanical agitation that can help a suitable cleaner lift or loosen deposits from the surface.
Can You Remove Hard Water Stains With a Power Drill?
Yes, but only on surfaces that can tolerate the brush and cleaning method being used.
A variable-speed drill fitted with a soft nylon cleaning attachment can make repetitive scrubbing easier on some durable surfaces. The rotating brush does the physical agitation that you would otherwise perform by hand.
That can be helpful when cleaning:
- Some ceramic or porcelain tile
- Durable grout in good condition
- Certain utility sinks
- Some uncoated, manufacturer-approved hard surfaces
- Textured surfaces that are difficult to scrub evenly by hand
However, a drill brush should not automatically be used everywhere that hard water appears.
Manufacturers frequently specify gentle cleaning for finished plumbing products. Kohler, for example, warns against abrasive materials on many faucet finishes and recommends testing cleaning products in an inconspicuous area first.
The correct question is therefore not simply, “Will a drill remove the stain?”
It is:
Can this particular surface safely handle a rotating brush, the chosen cleaner, and repeated mechanical contact?
Check the Surface Before Using a Drill Brush
This is the step most likely to prevent damage.
A cleaning technique that works well on durable tile can be completely inappropriate for acrylic, polished natural stone, decorative metal, or treated shower glass.
Ceramic and Porcelain Tile
Many glazed ceramic and porcelain surfaces are relatively durable, but the finish, grout condition, and manufacturer’s care instructions still matter.
If the manufacturer permits brushing:
- Start with the softest brush available.
- Use low drill speed.
- Apply light pressure.
- Test a small hidden area first.
- Keep abrasive grit out of the brush.
Be especially careful near decorative coatings, painted patterns, worn glaze, caulk lines, and damaged grout.
Grout
A drill brush can be useful for textured grout because the bristles can reach recesses that are difficult to clean with a flat sponge.
However, aggressive scrubbing can damage weak, deteriorated, unsealed, or crumbling grout.
Do not treat the drill like a grinding tool. If grout begins flaking, powdering, or eroding, stop.
Shower Glass
Do not assume a drill brush is safe for shower glass.
Kohler specifically advises against bristle brushes, abrasive sponges, abrasive cleaners, and sharp tools on its shower glass because they can scratch glass or surrounding metal surfaces. It recommends mild detergent and regular squeegee use instead.
Other shower doors may have protective coatings with their own care requirements.
For that reason, the safest rule is:
Do not use a drill brush on shower glass unless the manufacturer specifically allows that cleaning method.
Chrome, PVD, Painted, and Decorative Faucet Finishes
Avoid using a drill brush on finished faucets unless the manufacturer clearly permits it.
Kohler’s care instructions for certain faucet finishes advise using soft cloths or sponges and warn against abrasive materials. Some finishes also have restrictions on acids, bleach, ammonia, solvents, and other cleaners.
A powered brush can create more friction than hand wiping and can concentrate wear around edges and curves.
If the mineral buildup is on a faucet rather than on nearby tile, follow the faucet manufacturer’s cleaning instructions first.
Acrylic Tubs and Shower Bases
A drill brush is generally a poor default choice for glossy acrylic.
Kohler advises cleaning acrylic baths with a soft damp sponge or cloth and specifically says not to use abrasive materials such as brushes or scouring pads. American Standard similarly advises against abrasive cleaners on its acrylic tubs, whirlpools, and shower bases.
Powered scrubbing can dull or scratch a glossy acrylic surface even when the damage is not immediately obvious.
Fiberglass and Composite Surfaces
These materials vary considerably by manufacturer.
Some gelcoat or composite finishes can scratch or lose gloss when scrubbed aggressively. Use the manufacturer’s care instructions rather than assuming that a soft-looking drill brush is safe.
Natural Stone
Marble, limestone, travertine, and other natural stones require special care.
The Natural Stone Institute recommends neutral cleaners, stone soap, or mild dishwashing detergent for routine stone cleaning. It warns that vinegar, lemon, and other acidic products can dull or etch calcareous stone and that abrasive cleaning products can scratch some stone surfaces.
So a generic combination of “vinegar plus drill brush” should not be used on natural stone.
Stone restoration can involve specialized polishing techniques, but those are different from ordinary drill-brush cleaning and should follow stone-specific guidance.
What You Need to Remove Hard Water Stains With a Power Drill
For a suitable surface, gather the equipment before you begin.
A basic setup may include:
- Variable-speed cordless drill
- Soft nylon drill-brush attachment
- Surface-approved mineral or bathroom cleaner
- Clean microfiber cloths
- Soft hand brush or sponge
- Clean water
- Bucket or spray bottle
- Protective gloves appropriate for the cleaner
- Safety glasses
- Towels for keeping the work area controlled and dry
A cordless variable-speed drill is convenient because it gives you more control over brush speed and avoids running a power cord across a wet bathroom floor.
That does not make it waterproof.
OSHA advises that electric tools should not be used in damp or wet locations unless they are approved for those conditions. Power-tool manufacturers likewise warn that water entering a tool can increase electric-shock risk.
Keep the drill body and battery away from water, and never operate the tool while standing in pooled water.
How to Choose the Right Drill Brush
The safest useful brush is usually the least aggressive attachment that can complete the job.
Start With Soft Nylon
A soft nylon brush is a better starting point than a stiff abrasive brush.
Harder bristles may remove deposits faster, but they also increase the possibility of:
- Scratching
- Dulling
- Removing coatings
- Eroding grout
- Damaging caulk
- Leaving swirl marks
Do not assume that a brush is non-scratch simply because the manufacturer describes it as a cleaning attachment. Surface hardness and coatings vary.
Use the Right Shape
Brush shape affects control.
Flat brush: useful for broad tile surfaces.
Small round brush: useful around corners, grout intersections, and plumbing bases.
Narrow detail brush: useful in tight areas where a large rotating brush could hit surrounding finished surfaces.
A smaller brush often gives better control around faucets and edges, but keep it off delicate metal finishes.
Avoid Metal Brushes
Do not use wire wheels or metal brushes for routine hard-water cleaning.
They are far more aggressive than ordinary cleaning requires and can permanently scratch many household surfaces.
Keep the Brush Clean
A soft brush can become abrasive if sand, grit, metal particles, or construction debris becomes trapped in its bristles.
Rinse and inspect the attachment before use, especially if it has previously been used for another cleaning job.
What Cleaner Should You Use?
There is no single hard-water cleaner that is safe for every material.
This is why surface identification comes before cleaner selection.
Manufacturer-Approved Mineral Cleaner
If the surface manufacturer lists a specific cleaner for mineral deposits, that is the best place to start.
Follow:
- Dilution instructions
- Contact time
- Ventilation requirements
- Rinsing instructions
- PPE requirements
Do not assume that leaving a product on longer will improve performance. Some manufacturers specifically warn against allowing cleaners to soak on finished surfaces.
Mild Detergent
For lighter buildup, warm water and mild detergent may be enough to remove soap film and expose the mineral layer underneath.
Kohler recommends mild detergent diluted with water for routine care of its shower glass, while acrylic-care instructions from major manufacturers also emphasize mild, nonabrasive cleaning methods.
Acidic Cleaners and Vinegar
Acidic products can react with some mineral deposits, but they are not universally safe.
They can damage:
- Marble
- Limestone
- Travertine
- Some grout
- Certain metals
- Decorative faucet finishes
- Specialized coatings
The Natural Stone Institute specifically warns that vinegar, lemon, and other acids can dull or etch calcareous stone.
If you use an acidic hard-water cleaner, first confirm that both the surface and surrounding materials are acid-compatible.
How to Remove Hard Water Stains With a Power Drill
Once you have confirmed that the surface allows powered brushing, use a controlled process rather than attacking the stain at full speed.
Step 1: Identify the Surface
Determine exactly what you are cleaning.
Is it:
- Glazed ceramic?
- Porcelain?
- Grout?
- Acrylic?
- Natural stone?
- Coated glass?
- Chrome?
- Stainless steel?
- Painted metal?
If you do not know, find the product documentation before using a drill.
This one step can prevent permanent damage.
Step 2: Clean Away Loose Dirt and Soap Film
Rinse or wipe away loose debris first.
Hard water scale often sits beneath or mixes with soap scum. Removing surface grime allows the mineral cleaner to contact the deposit more directly.
It also reduces the chance that trapped grit will become an abrasive under the rotating brush.
Step 3: Test the Cleaner and Brush
Choose an inconspicuous location.
Apply a small amount of the cleaner and test the brush manually first if possible.
Then run the drill briefly at low speed.
After rinsing and drying, check for:
- Scratches
- Dulling
- Color change
- Loss of gloss
- Coating damage
- Grout erosion
Kohler specifically recommends testing unfamiliar cleaning solutions on an inconspicuous area before treating the entire surface.
Step 4: Apply the Cleaner
Apply the approved cleaner according to its label.
Do not flood the surface.
Excess liquid increases splatter and makes it more difficult to keep the drill dry.
If the product needs contact time, follow the stated instructions rather than improvising a longer soak.
Step 5: Attach the Brush Securely
Remove the drill battery or otherwise make sure the tool cannot start accidentally while changing the attachment.
OSHA recommends disconnecting electric tools before changing accessories such as bits.
Secure the brush firmly in the chuck or compatible holder.
Make sure it rotates evenly before bringing it into contact with the surface.
Step 6: Start at Low Speed
Begin with the lowest practical speed.
High speed is usually unnecessary for household mineral deposits and can:
- Increase splatter
- Generate more friction
- Reduce control
- Accelerate surface wear
- Throw cleaner toward your face
- Catch edges unexpectedly
The objective is controlled scrubbing, not polishing or grinding.
Step 7: Use Light Pressure
Let the brush move over the stain rather than forcing it into the surface.
Excessive downward pressure does not necessarily improve cleaning. It can deform the bristles and concentrate friction against the surface.
Keep the brush moving.
Do not hold a rotating attachment in one place for an extended period.
Step 8: Work in Small Sections
Clean a manageable area at a time.
A section of approximately the size you can comfortably control lets you see whether the deposits are actually loosening.
Small sections also help prevent the cleaner from drying on the surface.
Step 9: Rinse Thoroughly
After scrubbing, rinse the area with clean water according to the surface and cleaner instructions.
Residual cleaner can leave streaks or continue reacting with the material.
Keep rinse water away from the drill.
Step 10: Dry and Inspect
Dry the surface with a clean microfiber cloth.
Hard-water deposits can be difficult to judge while everything is wet because water temporarily hides some cloudy residue.
Once dry, check whether:
- The mineral scale is gone
- A second treatment is needed
- The remaining mark is actually an etch or scratch rather than a deposit
Repeat gentle cleaning before escalating to a more aggressive brush.
What if the Hard Water Stain Does Not Come Off?
If the stain remains after one controlled cleaning cycle, do not immediately switch to maximum drill speed or the stiffest brush you own.
First determine what remains.
Thick Mineral Scale
Heavy scale may require repeated applications of a surface-compatible mineral cleaner.
Several mild cycles are usually easier to control than one aggressive mechanical attack.
Soap Scum Mixed With Scale
A mineral deposit covered with soap film may respond poorly until the organic residue is removed.
Cleaning in stages can be more effective than trying to remove every type of residue simultaneously.
Etched Surface
Sometimes the visible mark is no longer a removable deposit.
Acid exposure or long-term mineral buildup may leave a surface dull, etched, or otherwise altered.
No amount of normal scrubbing will “clean away” material that has physically changed.
Natural Stone Institute guidance distinguishes actual stains and deposits from acid etching, which may require polishing rather than normal cleaning.
Damaged Finish
If the surface becomes cloudy even after the deposit is gone, the finish itself may be worn or chemically damaged.
Stop scrubbing and consult the manufacturer before proceeding.
Surfaces Where a Power Drill Is Often the Wrong Tool
A power drill is useful because it multiplies mechanical scrubbing. That same feature makes it risky on delicate materials.
Shower Door Glass
Kohler advises against bristle brushes and abrasive materials on its shower glass. Use the manufacturer’s recommended manual cleaning method instead.
Acrylic Bathtubs
Major plumbing manufacturers recommend soft cloths or sponges and warn against abrasive materials. Powered brushes are therefore not a safe default for acrylic.
Finished Faucets
Decorative finishes can scratch or react with aggressive cleaners. Follow the exact faucet manufacturer’s care instructions.
Marble and Limestone
Acids can etch calcareous stone. Use a stone-specific cleaning method instead of generic hard-water advice.
Coated or Painted Surfaces
Protective coatings and paint can be thinner and softer than the material beneath them. Even soft powered scrubbing may create visible wear.
Safety Rules When Cleaning With a Drill
A bathroom combines water, chemicals, slippery floors, and a rotating power tool, so basic precautions matter.
Keep the Power Tool Dry
Never immerse a drill or operate it in standing water.
OSHA states that electrical tools should not be used in wet or damp locations unless they are approved for that purpose.
Wear Eye Protection
A rotating brush can throw droplets, loosened scale, and cleaner.
Safety glasses protect against splashes and debris.
Use Gloves
Follow the cleaner label for hand protection.
Some mineral-removing products can irritate skin even when they are safe for the surface being cleaned.
Ventilate the Area
Open doors, use appropriate ventilation, and follow the cleaner manufacturer’s instructions.
Never Mix Cleaning Chemicals
Do not combine cleaners unless their manufacturers specifically instruct you to do so.
Most importantly, do not mix bleach with acidic cleaners such as vinegar. CDC documentation shows that mixing sodium hypochlorite bleach with acids can release chlorine gas, which can cause serious respiratory and eye irritation.
Control Hair and Clothing
A rotating brush can catch loose material.
Keep long hair, jewelry, sleeves, and other loose items away from the rotating attachment. Power-tool safety instructions similarly warn against loose clothing and hair near moving parts.
Common Mistakes to Avoid
Using Maximum Speed
Higher speed does not automatically equal better cleaning.
It often means less control and greater risk of splashing or surface damage.
Applying Too Much Pressure
If the cleaner and soft brush are not working, more pressure may only damage the finish.
Reassess the deposit and surface instead.
Using One Brush on Every Surface
The brush that cleaned rough floor tile may be too aggressive for a sink or wall finish.
Match the attachment to the material.
Starting With a Stiff Brush
Always begin with the least aggressive option.
You can repeat gentle cleaning. You cannot easily undo scratches.
Letting Cleaner Dry
Dried cleaner can leave residue or affect finishes.
Work in manageable sections and rinse according to instructions.
Scrubbing Over Caulk
Aggressive brushing can roughen, tear, or separate old caulk.
Clean caulk lines manually unless you know the attachment will not damage them.
Ignoring Surrounding Materials
A cleaner may be safe for tile but harmful to the faucet next to it.
Control overspray and rinse nearby surfaces promptly.
How to Prevent Hard Water Stains From Returning
Removing heavy scale is much more work than preventing repeated accumulation.
Dry Wet Surfaces
Water spots form when mineral-containing water remains on a surface and evaporates.
Drying the area reduces the amount of mineral residue left behind.
Kohler specifically recommends wiping or blotting plumbing surfaces dry and using a squeegee on shower doors to reduce water spots and lime buildup.
Use a Shower Squeegee
A quick pass after each shower removes much of the water before it evaporates.
This is especially useful on glass, tile, and other vertical surfaces.
Fix Drips
A faucet or showerhead that continually drips onto the same area creates ideal conditions for concentrated mineral buildup.
Repairing the leak addresses the source instead of repeatedly cleaning the symptom.
Clean Light Deposits Early
Fresh water spots are generally easier to manage than thick scale.
Routine gentle cleaning reduces how often aggressive methods are needed.
Consider the Water Source
If mineral deposits appear throughout the home, the issue may be the hardness of the water supply rather than a cleaning problem.
USGS notes that water hardness varies substantially by location and recommends using local water-quality information when making household decisions about hardness.
A water-treatment professional or local utility can help determine whether a softening or treatment system is appropriate for your water.
Is a Drill Brush Better Than Hand Scrubbing?
It depends on the surface and the size of the job.
A drill brush is most useful when:
- The surface is durable
- The manufacturer allows brushing
- The buildup covers a large area
- Repetitive hand scrubbing is inefficient
- The texture makes manual cleaning difficult
Hand cleaning is better when:
- The surface is delicate
- The stain is small
- You are working around finished fixtures
- The material is acrylic
- The glass manufacturer prohibits brushes
- The surface is natural stone
- Precise control matters more than speed
Power should be used to reduce labor, not to replace judgment.
Frequently Asked Questions
Can You Remove Hard Water Stains With a Power Drill?
Yes, a power drill fitted with a soft cleaning brush can help remove hard water deposits from some durable surfaces. Always confirm that the surface manufacturer allows brushing and test a hidden area first.
What Drill Brush Is Best for Hard Water Stains?
Start with a soft nylon brush. Avoid wire brushes and very stiff abrasive attachments. The safest brush is the least aggressive one that removes the buildup without affecting the surface.
Can I Use a Drill Brush on Shower Glass?
Do not use one unless the shower-door manufacturer specifically permits it. Kohler advises against bristle brushes and abrasive materials on its glass shower doors because they can scratch some surfaces.
Can I Use a Power Drill to Clean an Acrylic Tub?
It is generally better not to. Kohler and American Standard recommend soft cloths or sponges for acrylic surfaces and warn against abrasive cleaning materials.
Can I Use Vinegar With a Drill Brush?
Only if the material and surrounding finishes are compatible with acidic cleaners. Vinegar should not be treated as universally safe. The Natural Stone Institute warns that vinegar and other acids can etch or dull marble, limestone, and other calcareous stones.
Can I Use a Drill Brush on Grout?
A soft brush can be useful on sound grout if the tile and grout system permits it. Use low speed and light pressure. Stop if the grout powders, flakes, or begins to erode.
Should I Use a Corded or Cordless Drill?
A variable-speed cordless drill is convenient because it removes the extension cord from the immediate work area, but it is still an electrical tool and is not automatically waterproof. Keep any drill dry and out of standing water.
How Fast Should I Run the Drill?
Start at a low, controllable speed. There is no universal RPM that is safe for every brush and surface. Increase speed only if the attachment manufacturer and surface condition allow it.
Why Are My Hard Water Stains Still Visible After Cleaning?
The remaining mark may be heavy mineral scale, soap residue, an etched finish, or permanent surface damage. If repeated gentle cleaning does not improve it, identify the material and consult its care instructions before becoming more aggressive.
How Do I Stop Hard Water Spots From Coming Back?
Remove standing water after use, squeegee shower surfaces, dry fixtures, repair drips, and clean light deposits before they become thick scale. If buildup is widespread throughout the home, consider checking the hardness of the water supply.
Conclusion
The safest way to remove hard water stains with a power drill is to use a soft brush, low speed, light pressure, and a cleaner that is specifically compatible with the surface underneath the mineral buildup. A drill brush can save significant effort on suitable durable tile, grout, and similar surfaces, but more mechanical power is not automatically better cleaning.
Before using the drill, identify the material and check its care requirements. Shower glass, decorative faucet finishes, glossy acrylic, natural stone, and coated surfaces can require much gentler methods. Major plumbing manufacturers specifically warn against abrasive brushes on several of these materials, while natural-stone guidance warns that acidic cleaners such as vinegar can etch certain stone.
Keep the drill dry, wear appropriate eye and hand protection, work with adequate ventilation, and never mix cleaning chemicals. After the stains are removed, regular drying and squeegee use can reduce the mineral residue left behind when hard water evaporates.
The goal is not to scrub as aggressively as possible. It is to remove the mineral deposit while leaving the underlying surface exactly as it was.